Using Postman with Cisco APIC REST API
Some instructions on getting started with using Postman with Cisco APIC REST API.
Click on any of the images / screenshots shown to enlarge.
Some of this material was lifted from Du’An Lightfoot’s very helpful YouTube channel.
Initial setup
Firstly, if you have not yet done so, create an account with Cisco.
Log into the Cisco sandbox: https://developer.cisco.com/site/sandbox
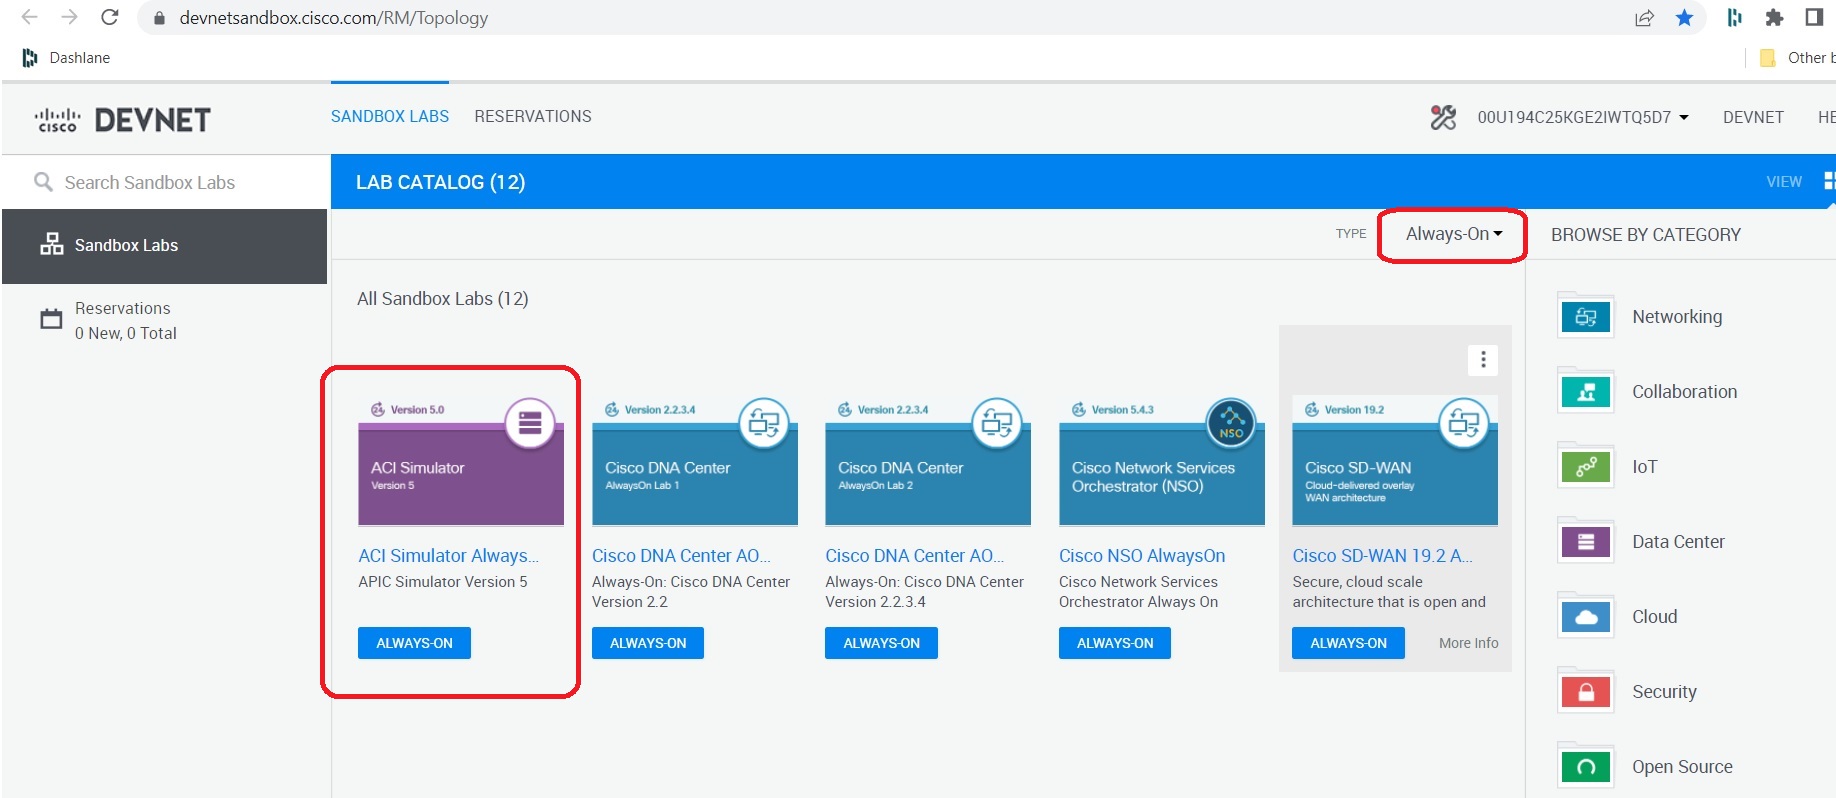
Click on the ACI ‘Always On’ simulator:
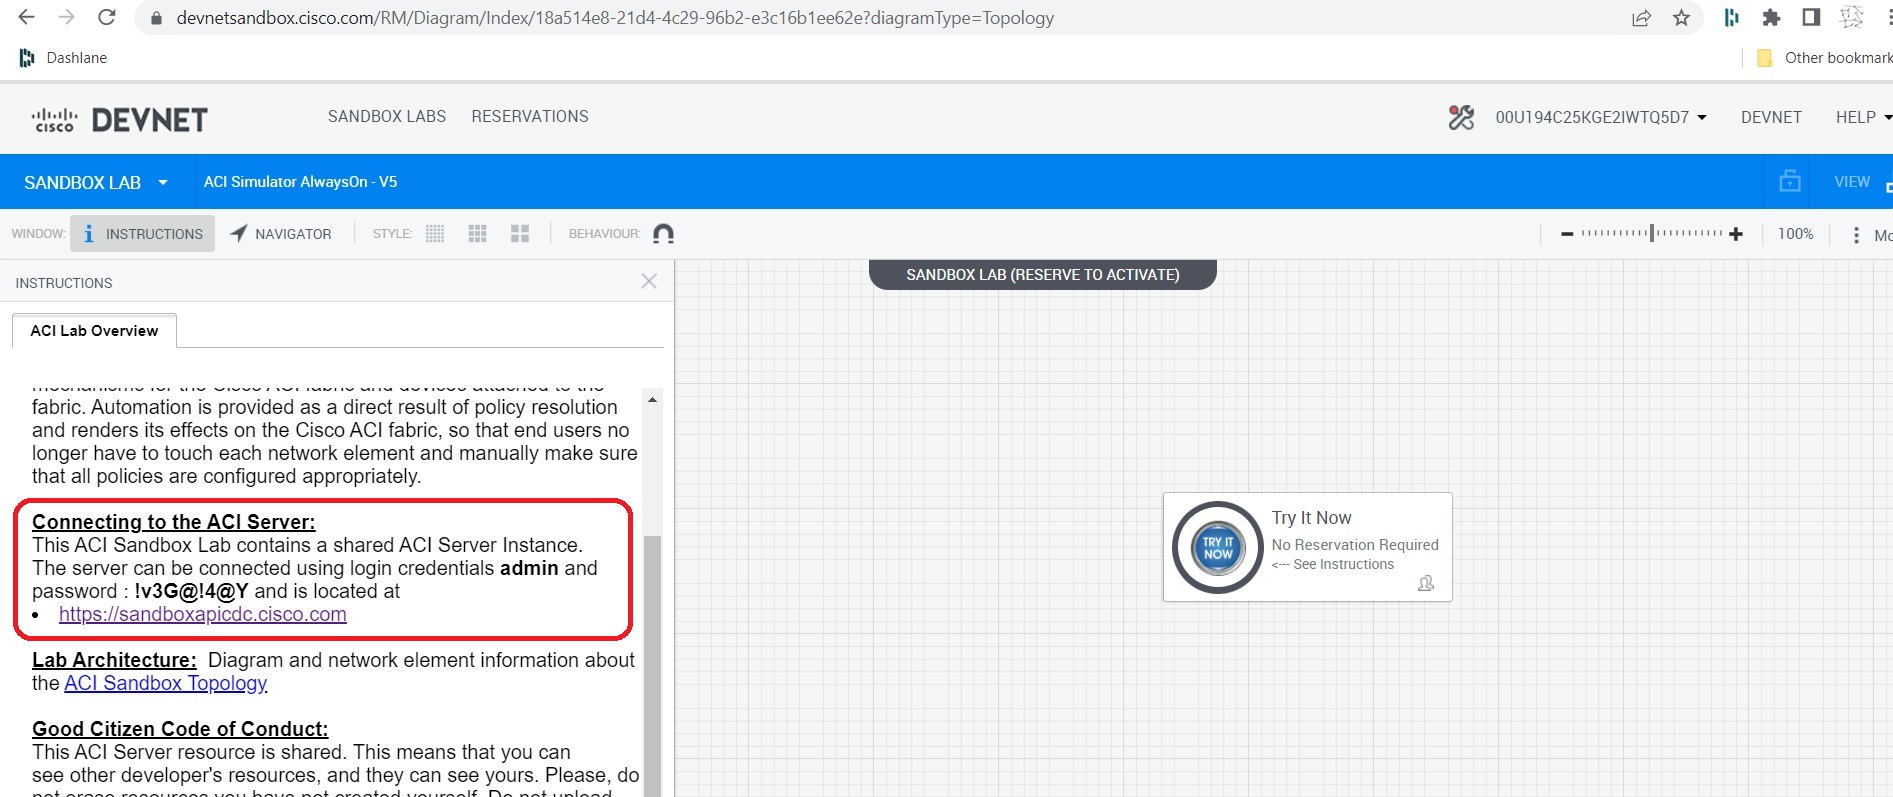
 This directs you to another URL which gives another link to click on to direct you to the sandbox. Grab the username / password credentials highlighted as below (click to enlarge).
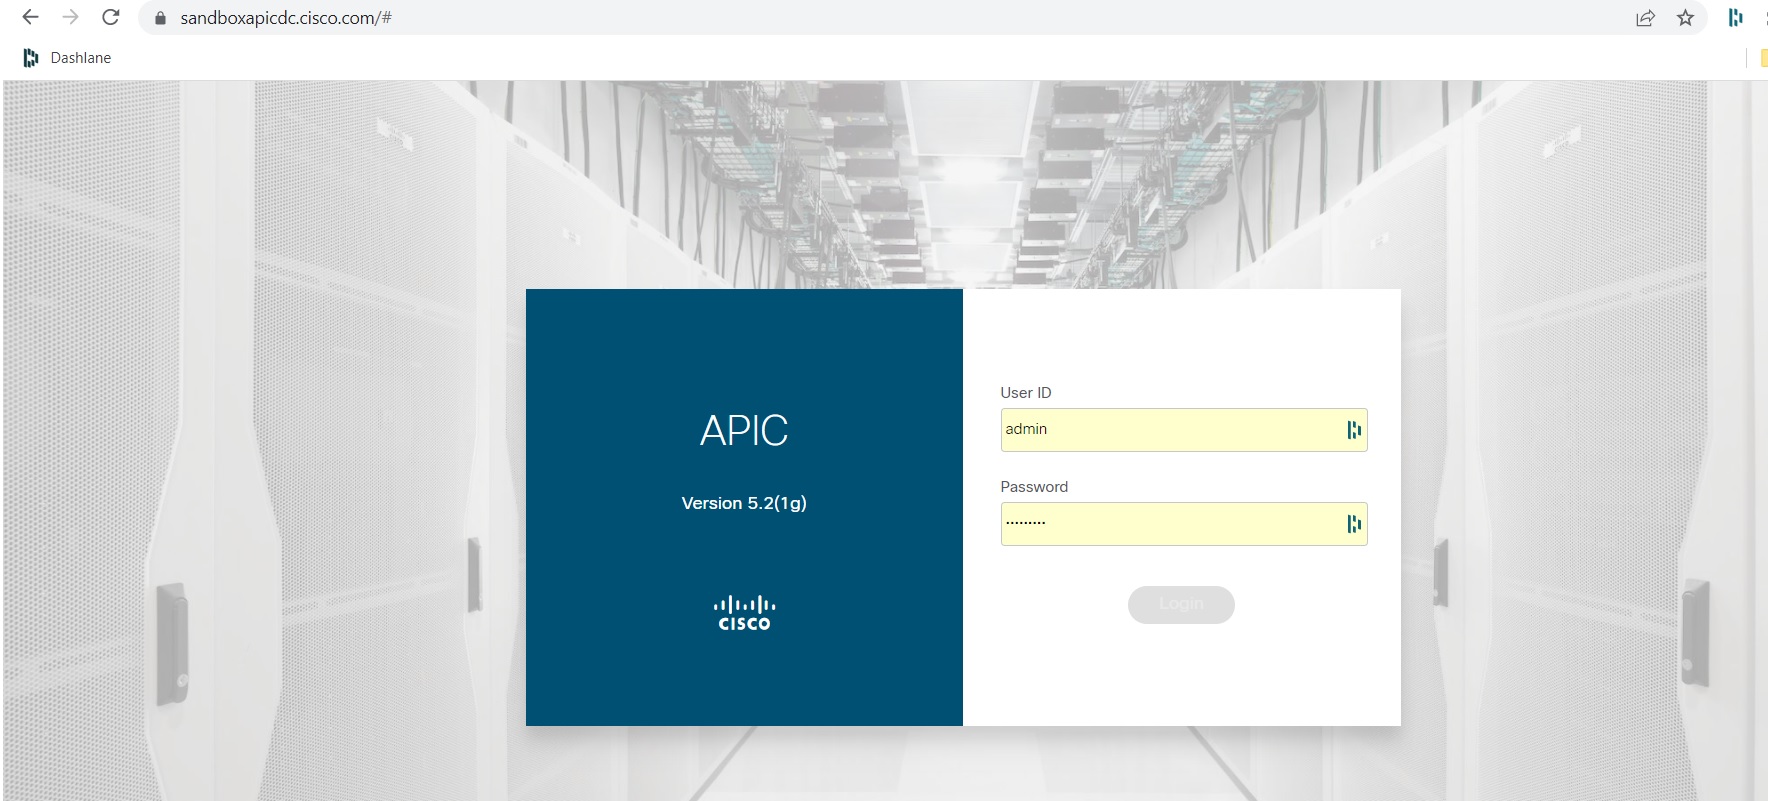
 On clicking this you are directed to the actual ACI sandbox. You can login using the credentials that were provided:
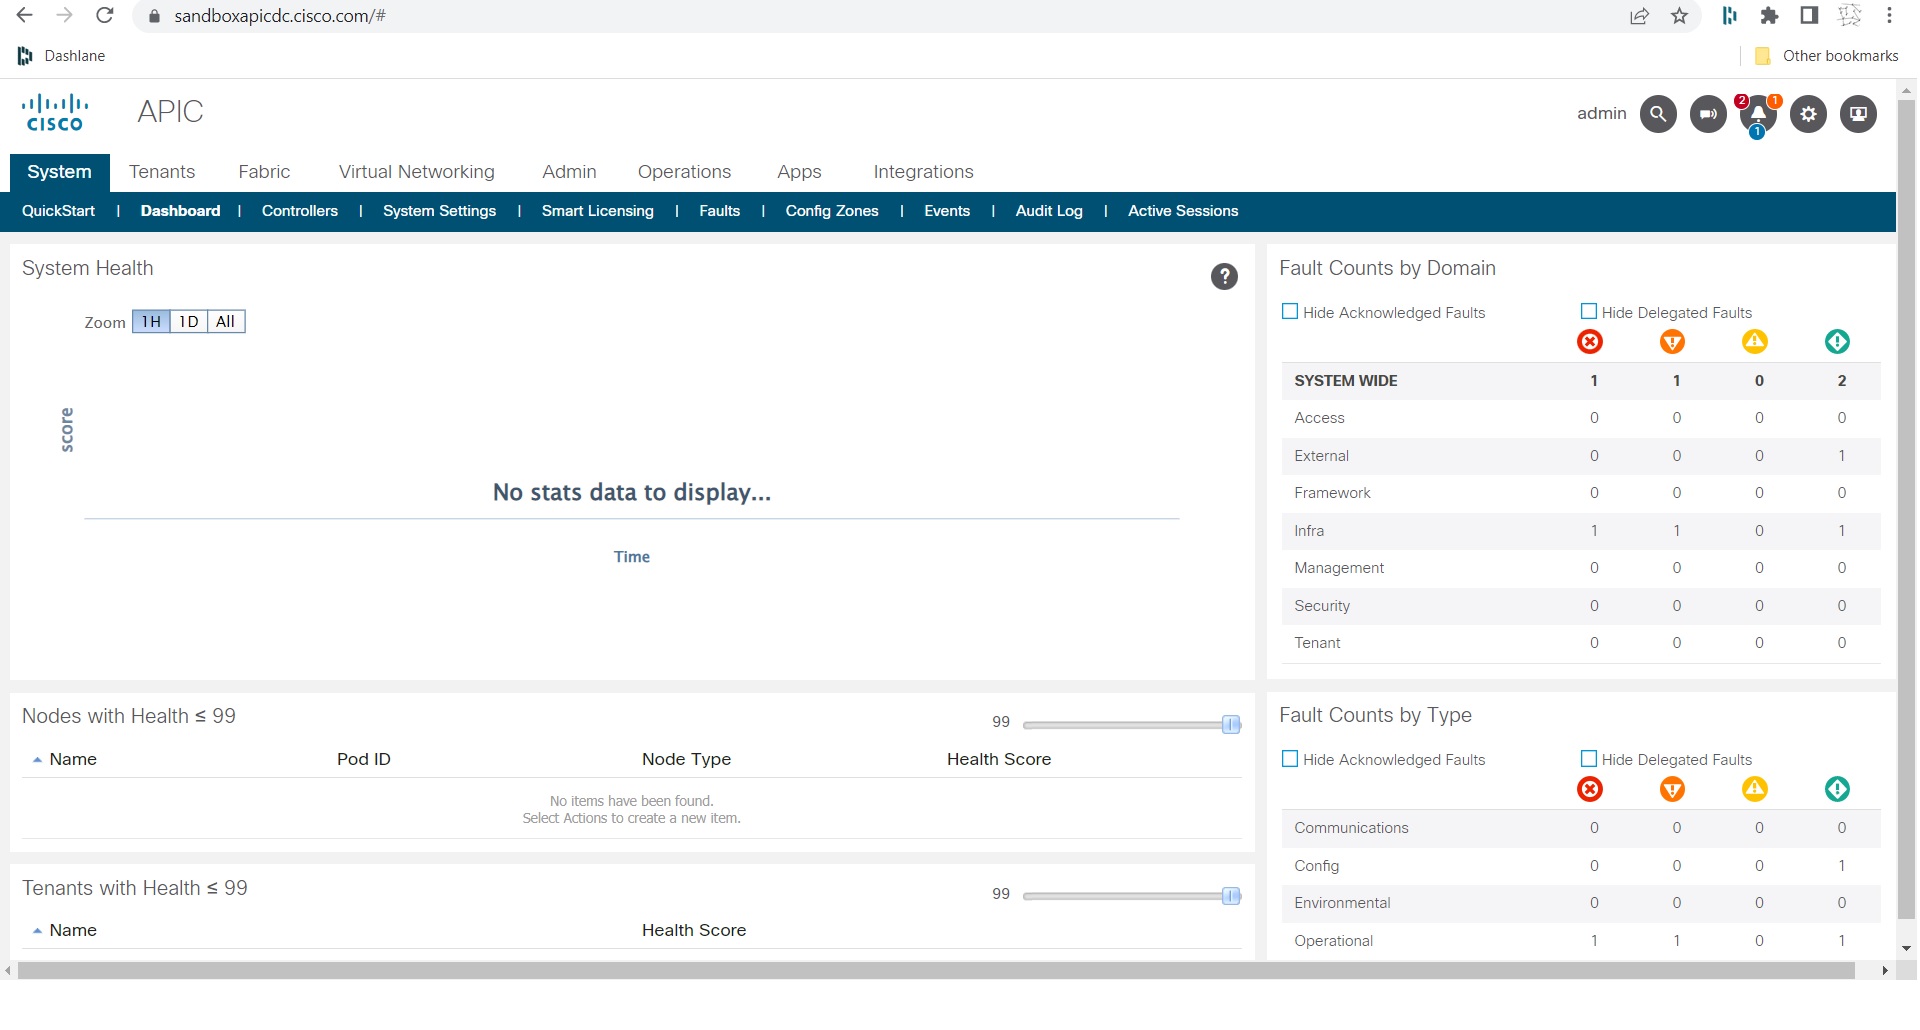
 Thereby directing you to the sandboxed APIC ACI Inspector:
 Authentication
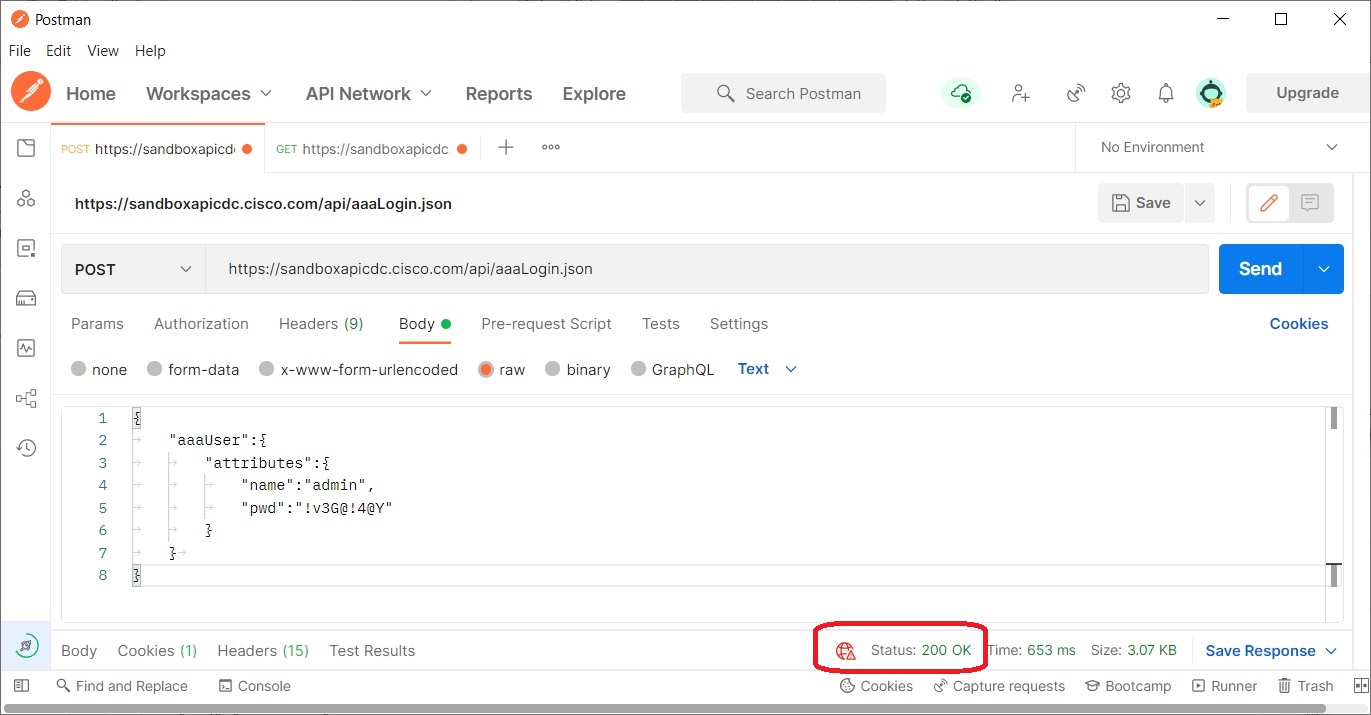
To use the example POST login API, obtain Postman, an application used for testing APIs.
Use the POST command: https://sandboxapicdc.cisco.com/api/aaaLogin.json
Use the credentials provided in the initial setup for "name" and "pwd" to create the API body. The password may have changed since writing this blog post.
[code language="xml"]
{
"aaaUser":{
"attributes":{
"name":"admin",
"pwd":"!v3G@!4@Y"
}
}
}
[/code]
Make sure ‘Enable SSL certificate verification’ is switched off in the Settings tab and hit the Send button to get the 200 OK response:
Authentication
To use the example POST login API, obtain Postman, an application used for testing APIs.
Use the POST command: https://sandboxapicdc.cisco.com/api/aaaLogin.json
Use the credentials provided in the initial setup for "name" and "pwd" to create the API body. The password may have changed since writing this blog post.
[code language="xml"]
{
"aaaUser":{
"attributes":{
"name":"admin",
"pwd":"!v3G@!4@Y"
}
}
}
[/code]
Make sure ‘Enable SSL certificate verification’ is switched off in the Settings tab and hit the Send button to get the 200 OK response:
 And this is what you get in the body of the response, including the token and refresh timeout period:
[code language="xml"]
{
"totalCount": "1",
"imdata": [
{
"aaaLogin": {
"attributes": {
"token": "eyJhbGciOiJSUzI1NiIsImtpZCI6InMxMWdlb2ZiazNvNjd4bnJtaDl0NGlvMnlzYzd0ZnJyIiwidHlwIjoiand0In0.eyJyYmFjIjpbeyJkb21haW4iOiJhbGwiLCJyb2xlc1IiOjAsInJvbGVzVyI6MX1dLCJpc3MiOiJBQ0kgQVBJQyIsInVzZXJuYW1lIjoiYWRtaW4iLCJ1c2VyaWQiOjE1Mzc0LCJ1c2VyZmxhZ3MiOjAsImlhdCI6MTY0ODg4MzkwNSwiZXhwIjoxNjQ4ODg0NTA1LCJzZXNzaW9uaWQiOiJDL0pqcFUzUFFvbVlld1IzNjVCdVF3PT0ifQ.nQOAKpSUrE8a_2Uh5YMztChz2SNdGISVqsZpJspktDh2rMbI_C_EnNsluTPcwA4CzcznCgrb0plk5xcFYwmKUcwV14LbzuVbLssLjq82t5-fzu3495y_NSzB0cu2Q1-qkLhxjdD3MrdxLdxSsAEyZUgvUsJTz1Khj1w6S8lSh6_Ibt_lo0FttZRpG1uE_cMlMmR6MUm4vvxBn41z7NEXsRt3SxnCV_IT9iqw3ElwB5NfotsScNBkkNl1t1F8reH2wqrKl5vuksM4HTs058297uyib6qmfkyJPZgy46V3J3SAf7Cy_KtiOsZ8nSwYlWmCSYjIlyAptayZqxyutUDMLA",
"siteFingerprint": "s11geofbk3o67xnrmh9t4io2ysc7tfrr",
"refreshTimeoutSeconds": "600",
"maximumLifetimeSeconds": "86400",
"guiIdleTimeoutSeconds": "1200",
"restTimeoutSeconds": "90",
"creationTime": "1648883905",
"firstLoginTime": "1648883905",
"userName": "admin",
"remoteUser": "false",
"unixUserId": "15374",
"sessionId": "C/JjpU3PQomYewR365BuQw==",
"lastName": "",
"firstName": "",
"changePassword": "no",
"version": "5.2(1g)",
"buildTime": "Wed Jul 28 23:09:38 UTC 2021",
"node": "topology/pod-1/node-1"
},
"children": [
{
"aaaUserDomain": {
"attributes": {
"name": "all",
"rolesR": "admin",
"rolesW": "admin"
},
"children": [
{
"aaaReadRoles": {
"attributes": {}
}
},
{
"aaaWriteRoles": {
"attributes": {},
"children": [
{
"role": {
"attributes": {
"name": "admin"
}
}
}
]
}
}
]
}
},
{
"DnDomainMapEntry": {
"attributes": {
"dn": "uni/tn-mgmt",
"readPrivileges": "admin",
"writePrivileges": "admin"
}
}
},
{
"DnDomainMapEntry": {
"attributes": {
"dn": "uni/tn-infra",
"readPrivileges": "admin",
"writePrivileges": "admin"
}
}
},
{
"DnDomainMapEntry": {
"attributes": {
"dn": "uni/tn-common",
"readPrivileges": "admin",
"writePrivileges": "admin"
}
}
}
]
}
}
]
}
[/code]
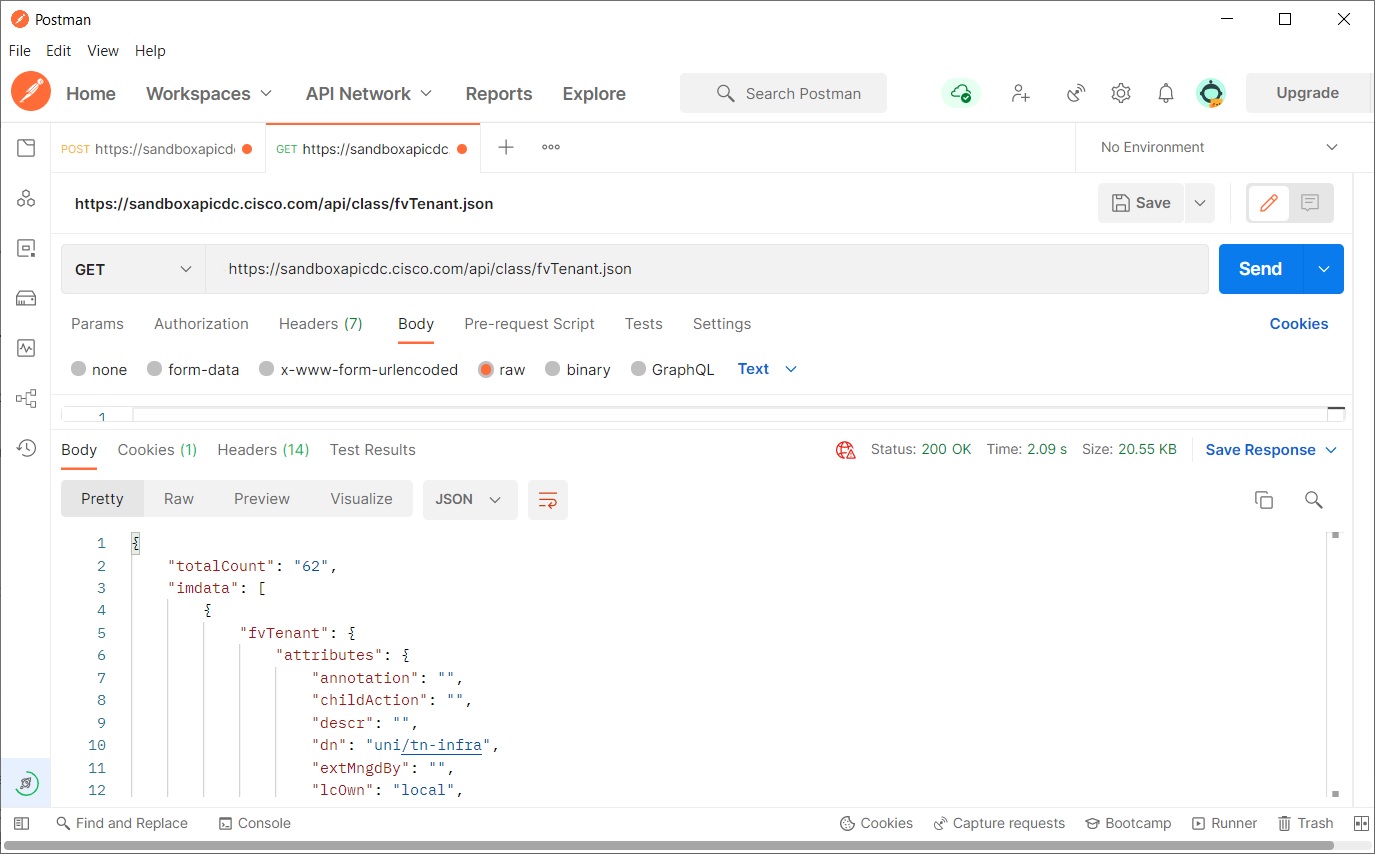
Obtaining tenant details
An example GET command to obtain the number and details of tenants in this sandbox APIC:
[code language="txt"]
GET https://sandboxapicdc.cisco.com/api/class/fvTenant.json
[/code]
And this is what you get in the body of the response, including the token and refresh timeout period:
[code language="xml"]
{
"totalCount": "1",
"imdata": [
{
"aaaLogin": {
"attributes": {
"token": "eyJhbGciOiJSUzI1NiIsImtpZCI6InMxMWdlb2ZiazNvNjd4bnJtaDl0NGlvMnlzYzd0ZnJyIiwidHlwIjoiand0In0.eyJyYmFjIjpbeyJkb21haW4iOiJhbGwiLCJyb2xlc1IiOjAsInJvbGVzVyI6MX1dLCJpc3MiOiJBQ0kgQVBJQyIsInVzZXJuYW1lIjoiYWRtaW4iLCJ1c2VyaWQiOjE1Mzc0LCJ1c2VyZmxhZ3MiOjAsImlhdCI6MTY0ODg4MzkwNSwiZXhwIjoxNjQ4ODg0NTA1LCJzZXNzaW9uaWQiOiJDL0pqcFUzUFFvbVlld1IzNjVCdVF3PT0ifQ.nQOAKpSUrE8a_2Uh5YMztChz2SNdGISVqsZpJspktDh2rMbI_C_EnNsluTPcwA4CzcznCgrb0plk5xcFYwmKUcwV14LbzuVbLssLjq82t5-fzu3495y_NSzB0cu2Q1-qkLhxjdD3MrdxLdxSsAEyZUgvUsJTz1Khj1w6S8lSh6_Ibt_lo0FttZRpG1uE_cMlMmR6MUm4vvxBn41z7NEXsRt3SxnCV_IT9iqw3ElwB5NfotsScNBkkNl1t1F8reH2wqrKl5vuksM4HTs058297uyib6qmfkyJPZgy46V3J3SAf7Cy_KtiOsZ8nSwYlWmCSYjIlyAptayZqxyutUDMLA",
"siteFingerprint": "s11geofbk3o67xnrmh9t4io2ysc7tfrr",
"refreshTimeoutSeconds": "600",
"maximumLifetimeSeconds": "86400",
"guiIdleTimeoutSeconds": "1200",
"restTimeoutSeconds": "90",
"creationTime": "1648883905",
"firstLoginTime": "1648883905",
"userName": "admin",
"remoteUser": "false",
"unixUserId": "15374",
"sessionId": "C/JjpU3PQomYewR365BuQw==",
"lastName": "",
"firstName": "",
"changePassword": "no",
"version": "5.2(1g)",
"buildTime": "Wed Jul 28 23:09:38 UTC 2021",
"node": "topology/pod-1/node-1"
},
"children": [
{
"aaaUserDomain": {
"attributes": {
"name": "all",
"rolesR": "admin",
"rolesW": "admin"
},
"children": [
{
"aaaReadRoles": {
"attributes": {}
}
},
{
"aaaWriteRoles": {
"attributes": {},
"children": [
{
"role": {
"attributes": {
"name": "admin"
}
}
}
]
}
}
]
}
},
{
"DnDomainMapEntry": {
"attributes": {
"dn": "uni/tn-mgmt",
"readPrivileges": "admin",
"writePrivileges": "admin"
}
}
},
{
"DnDomainMapEntry": {
"attributes": {
"dn": "uni/tn-infra",
"readPrivileges": "admin",
"writePrivileges": "admin"
}
}
},
{
"DnDomainMapEntry": {
"attributes": {
"dn": "uni/tn-common",
"readPrivileges": "admin",
"writePrivileges": "admin"
}
}
}
]
}
}
]
}
[/code]
Obtaining tenant details
An example GET command to obtain the number and details of tenants in this sandbox APIC:
[code language="txt"]
GET https://sandboxapicdc.cisco.com/api/class/fvTenant.json
[/code]
 Tenant details in json format as follows
[code language="xml"]
{
"totalCount": "8",
"imdata": [
{
"fvTenant": {
"attributes": {
"annotation": "",
"childAction": "",
"descr": "",
"dn": "uni/tn-infra",
"extMngdBy": "",
"lcOwn": "local",
"modTs": "2022-04-01T11:14:49.584+00:00",
"monPolDn": "uni/tn-common/monepg-default",
"name": "infra",
"nameAlias": "",
"ownerKey": "",
"ownerTag": "",
"status": "",
"uid": "0",
"userdom": "all"
}
}
},
{
"fvTenant": {
"attributes": {
"annotation": "",
"childAction": "",
"descr": "",
"dn": "uni/tn-common",
"extMngdBy": "",
"lcOwn": "local",
"modTs": "2022-04-01T11:14:44.190+00:00",
"monPolDn": "uni/tn-common/monepg-default",
"name": "common",
"nameAlias": "",
"ownerKey": "",
"ownerTag": "",
"status": "",
"uid": "0",
"userdom": "all"
}
}
},
{
"fvTenant": {
"attributes": {
"annotation": "",
"childAction": "",
"descr": "",
"dn": "uni/tn-mgmt",
"extMngdBy": "",
"lcOwn": "local",
"modTs": "2022-04-01T11:14:49.186+00:00",
"monPolDn": "uni/tn-common/monepg-default",
"name": "mgmt",
"nameAlias": "",
"ownerKey": "",
"ownerTag": "",
"status": "",
"uid": "0",
"userdom": "all"
}
}
},
{
"fvTenant": {
"attributes": {
"annotation": "",
"childAction": "",
"descr": "Try ACI tool demo at https://oneaciapp.talapupa.com",
"dn": "uni/tn-oneaciapp",
"extMngdBy": "",
"lcOwn": "local",
"modTs": "2022-04-01T11:23:50.049+00:00",
"monPolDn": "uni/tn-common/monepg-default",
"name": "oneaciapp",
"nameAlias": "",
"ownerKey": "",
"ownerTag": "",
"status": "",
"uid": "15374",
"userdom": ":all:"
}
}
},
{
"fvTenant": {
"attributes": {
"annotation": "",
"childAction": "",
"descr": "",
"dn": "uni/tn-Heroes",
"extMngdBy": "",
"lcOwn": "local",
"modTs": "2022-04-01T11:27:26.480+00:00",
"monPolDn": "uni/tn-common/monepg-default",
"name": "Heroes",
"nameAlias": "",
"ownerKey": "",
"ownerTag": "",
"status": "",
"uid": "15374",
"userdom": ":all:"
}
}
},
{
"fvTenant": {
"attributes": {
"annotation": "",
"childAction": "",
"descr": "",
"dn": "uni/tn-SnV",
"extMngdBy": "",
"lcOwn": "local",
"modTs": "2022-04-01T11:27:26.751+00:00",
"monPolDn": "uni/tn-common/monepg-default",
"name": "SnV",
"nameAlias": "",
"ownerKey": "",
"ownerTag": "",
"status": "",
"uid": "15374",
"userdom": ":all:"
}
}
},
{
"fvTenant": {
"attributes": {
"annotation": "",
"childAction": "",
"descr": "",
"dn": "uni/tn-Aravid",
"extMngdBy": "",
"lcOwn": "local",
"modTs": "2022-04-01T12:16:43.874+00:00",
"monPolDn": "uni/tn-common/monepg-default",
"name": "Aravid",
"nameAlias": "",
"ownerKey": "",
"ownerTag": "",
"status": "",
"uid": "15374",
"userdom": ":all:"
}
}
},
{
"fvTenant": {
"attributes": {
"annotation": "",
"childAction": "",
"descr": "",
"dn": "uni/tn-tenant_public",
"extMngdBy": "",
"lcOwn": "local",
"modTs": "2022-04-01T12:25:26.738+00:00",
"monPolDn": "uni/tn-common/monepg-default",
"name": "tenant_public",
"nameAlias": "",
"ownerKey": "",
"ownerTag": "",
"status": "",
"uid": "15374",
"userdom": ":all:"
}
}
}
]
}
[/code]
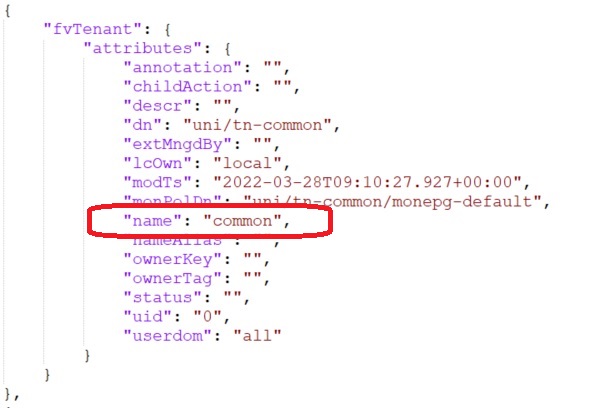
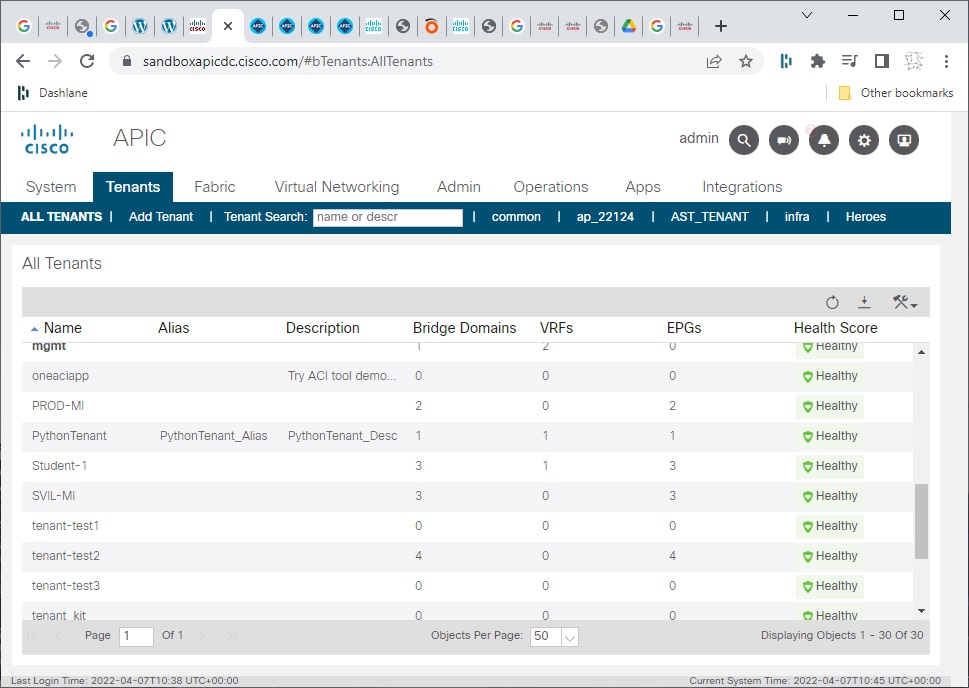
One of the tenants is “common”. Search for this in the All Tenants tab to get information on end point groups (EPGs), bridge domains etc:
Tenant details in json format as follows
[code language="xml"]
{
"totalCount": "8",
"imdata": [
{
"fvTenant": {
"attributes": {
"annotation": "",
"childAction": "",
"descr": "",
"dn": "uni/tn-infra",
"extMngdBy": "",
"lcOwn": "local",
"modTs": "2022-04-01T11:14:49.584+00:00",
"monPolDn": "uni/tn-common/monepg-default",
"name": "infra",
"nameAlias": "",
"ownerKey": "",
"ownerTag": "",
"status": "",
"uid": "0",
"userdom": "all"
}
}
},
{
"fvTenant": {
"attributes": {
"annotation": "",
"childAction": "",
"descr": "",
"dn": "uni/tn-common",
"extMngdBy": "",
"lcOwn": "local",
"modTs": "2022-04-01T11:14:44.190+00:00",
"monPolDn": "uni/tn-common/monepg-default",
"name": "common",
"nameAlias": "",
"ownerKey": "",
"ownerTag": "",
"status": "",
"uid": "0",
"userdom": "all"
}
}
},
{
"fvTenant": {
"attributes": {
"annotation": "",
"childAction": "",
"descr": "",
"dn": "uni/tn-mgmt",
"extMngdBy": "",
"lcOwn": "local",
"modTs": "2022-04-01T11:14:49.186+00:00",
"monPolDn": "uni/tn-common/monepg-default",
"name": "mgmt",
"nameAlias": "",
"ownerKey": "",
"ownerTag": "",
"status": "",
"uid": "0",
"userdom": "all"
}
}
},
{
"fvTenant": {
"attributes": {
"annotation": "",
"childAction": "",
"descr": "Try ACI tool demo at https://oneaciapp.talapupa.com",
"dn": "uni/tn-oneaciapp",
"extMngdBy": "",
"lcOwn": "local",
"modTs": "2022-04-01T11:23:50.049+00:00",
"monPolDn": "uni/tn-common/monepg-default",
"name": "oneaciapp",
"nameAlias": "",
"ownerKey": "",
"ownerTag": "",
"status": "",
"uid": "15374",
"userdom": ":all:"
}
}
},
{
"fvTenant": {
"attributes": {
"annotation": "",
"childAction": "",
"descr": "",
"dn": "uni/tn-Heroes",
"extMngdBy": "",
"lcOwn": "local",
"modTs": "2022-04-01T11:27:26.480+00:00",
"monPolDn": "uni/tn-common/monepg-default",
"name": "Heroes",
"nameAlias": "",
"ownerKey": "",
"ownerTag": "",
"status": "",
"uid": "15374",
"userdom": ":all:"
}
}
},
{
"fvTenant": {
"attributes": {
"annotation": "",
"childAction": "",
"descr": "",
"dn": "uni/tn-SnV",
"extMngdBy": "",
"lcOwn": "local",
"modTs": "2022-04-01T11:27:26.751+00:00",
"monPolDn": "uni/tn-common/monepg-default",
"name": "SnV",
"nameAlias": "",
"ownerKey": "",
"ownerTag": "",
"status": "",
"uid": "15374",
"userdom": ":all:"
}
}
},
{
"fvTenant": {
"attributes": {
"annotation": "",
"childAction": "",
"descr": "",
"dn": "uni/tn-Aravid",
"extMngdBy": "",
"lcOwn": "local",
"modTs": "2022-04-01T12:16:43.874+00:00",
"monPolDn": "uni/tn-common/monepg-default",
"name": "Aravid",
"nameAlias": "",
"ownerKey": "",
"ownerTag": "",
"status": "",
"uid": "15374",
"userdom": ":all:"
}
}
},
{
"fvTenant": {
"attributes": {
"annotation": "",
"childAction": "",
"descr": "",
"dn": "uni/tn-tenant_public",
"extMngdBy": "",
"lcOwn": "local",
"modTs": "2022-04-01T12:25:26.738+00:00",
"monPolDn": "uni/tn-common/monepg-default",
"name": "tenant_public",
"nameAlias": "",
"ownerKey": "",
"ownerTag": "",
"status": "",
"uid": "15374",
"userdom": ":all:"
}
}
}
]
}
[/code]
One of the tenants is “common”. Search for this in the All Tenants tab to get information on end point groups (EPGs), bridge domains etc:
 Creating a new tenant
Create a new tenant by using a POST command and json body containing the name, description etc. This should return a status code of 200.
POST https://sandboxapicdc.cisco.com/api/mo/uni/tn-Support.json
Body (raw)
[code language="xml"]
{
"fvTenant" : {
"attributes" : {
"name":"Support",
"descr":"The Support Organization Tenant",
"nameAlias":"Andy",
"status":"created,modified"
}
}
}
[/code]
Output:
[code language="xml"]
{
"totalCount": "0",
"imdata": []
}
[/code]
Then do the GET command to obtain the tenant information again:
GET https://sandboxapicdc.cisco.com/api/mo/uni/tn-Support.json
And we get back the tenant we just created:
[code language="xml"]
{
"totalCount": "1",
"imdata": [
{
"fvTenant": {
"attributes": {
"annotation": "",
"childAction": "",
"descr": "The Support Organization Tenant",
"dn": "uni/tn-Support",
"extMngdBy": "",
"lcOwn": "local",
"modTs": "2022-04-07T12:23:41.077+00:00",
"monPolDn": "uni/tn-common/monepg-default",
"name": "Support",
"nameAlias": "Andy",
"ownerKey": "",
"ownerTag": "",
"status": "",
"uid": "15374",
"userdom": ":all:"
}
}
}
]
}
[/code]
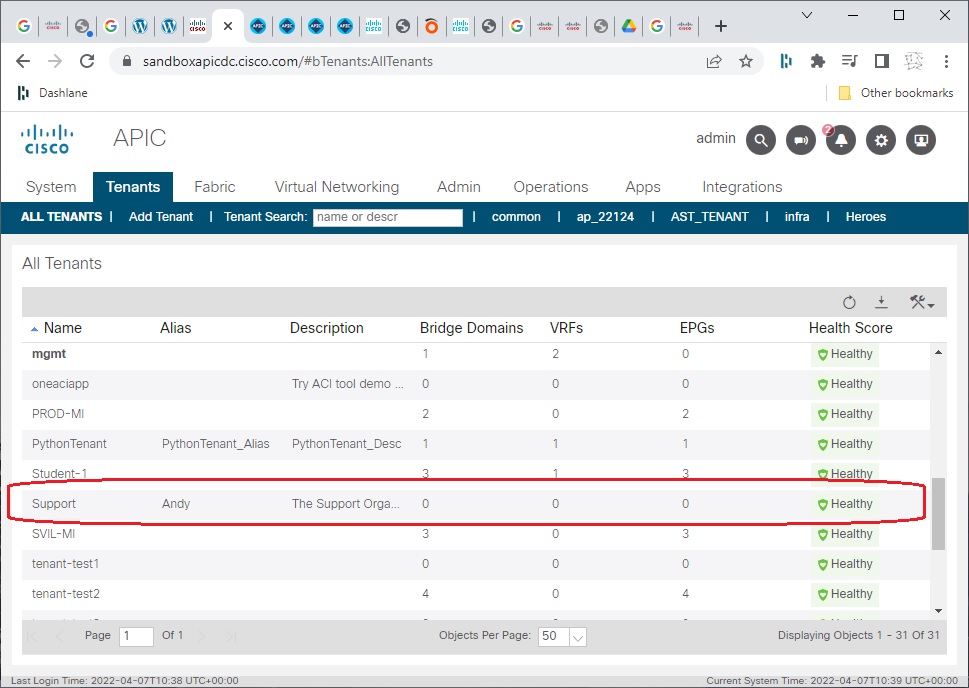
View the list of all tenants in the APIC on the tenant in the APIC sandbox and see that the new tenant has been added:
Creating a new tenant
Create a new tenant by using a POST command and json body containing the name, description etc. This should return a status code of 200.
POST https://sandboxapicdc.cisco.com/api/mo/uni/tn-Support.json
Body (raw)
[code language="xml"]
{
"fvTenant" : {
"attributes" : {
"name":"Support",
"descr":"The Support Organization Tenant",
"nameAlias":"Andy",
"status":"created,modified"
}
}
}
[/code]
Output:
[code language="xml"]
{
"totalCount": "0",
"imdata": []
}
[/code]
Then do the GET command to obtain the tenant information again:
GET https://sandboxapicdc.cisco.com/api/mo/uni/tn-Support.json
And we get back the tenant we just created:
[code language="xml"]
{
"totalCount": "1",
"imdata": [
{
"fvTenant": {
"attributes": {
"annotation": "",
"childAction": "",
"descr": "The Support Organization Tenant",
"dn": "uni/tn-Support",
"extMngdBy": "",
"lcOwn": "local",
"modTs": "2022-04-07T12:23:41.077+00:00",
"monPolDn": "uni/tn-common/monepg-default",
"name": "Support",
"nameAlias": "Andy",
"ownerKey": "",
"ownerTag": "",
"status": "",
"uid": "15374",
"userdom": ":all:"
}
}
}
]
}
[/code]
View the list of all tenants in the APIC on the tenant in the APIC sandbox and see that the new tenant has been added:
 Deleting a tenant
Use the DELETE command to remove the tenant you created
DELETE https://sandboxapicdc.cisco.com/api/mo/uni/tn-Support.json
And see that the Support tenant is no longer visible in the APIC sandbox:
Deleting a tenant
Use the DELETE command to remove the tenant you created
DELETE https://sandboxapicdc.cisco.com/api/mo/uni/tn-Support.json
And see that the Support tenant is no longer visible in the APIC sandbox:
 Create a fabric policy
In the previous examples the REST command and body text were provided. In this example we use the APIC API Inspector to create API requests to perform the operations.
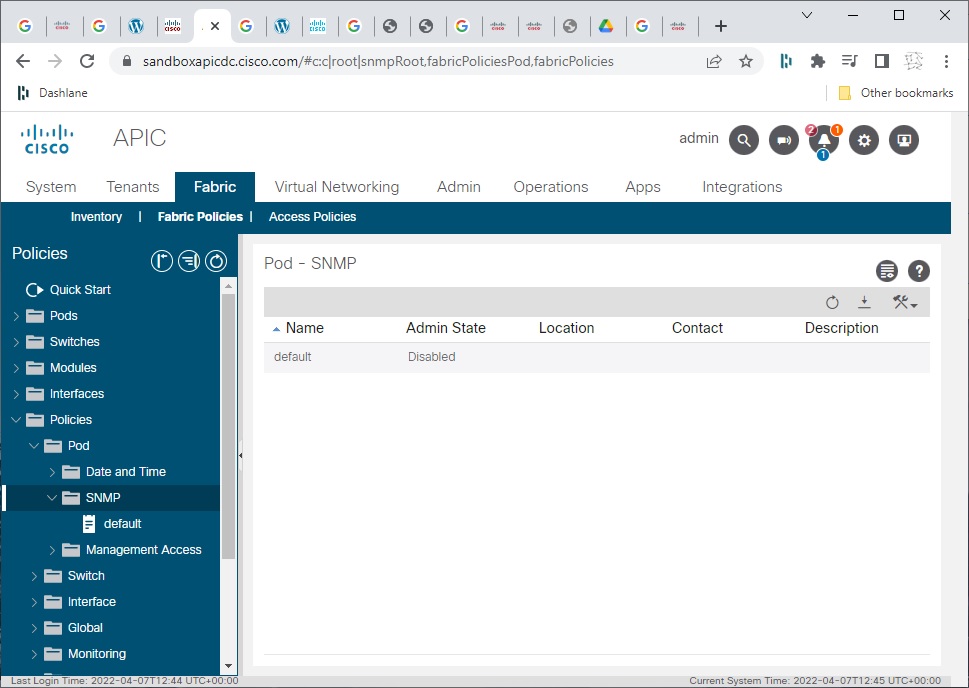
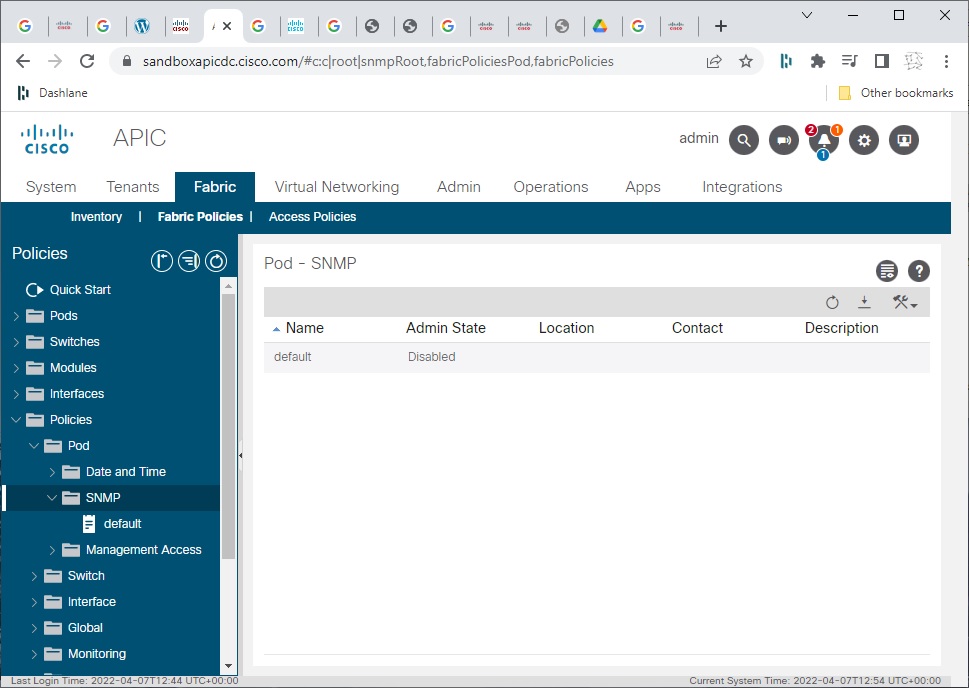
In APIC sandbox, navigate to Fabric > Fabric Policies tab:
Create a fabric policy
In the previous examples the REST command and body text were provided. In this example we use the APIC API Inspector to create API requests to perform the operations.
In APIC sandbox, navigate to Fabric > Fabric Policies tab:
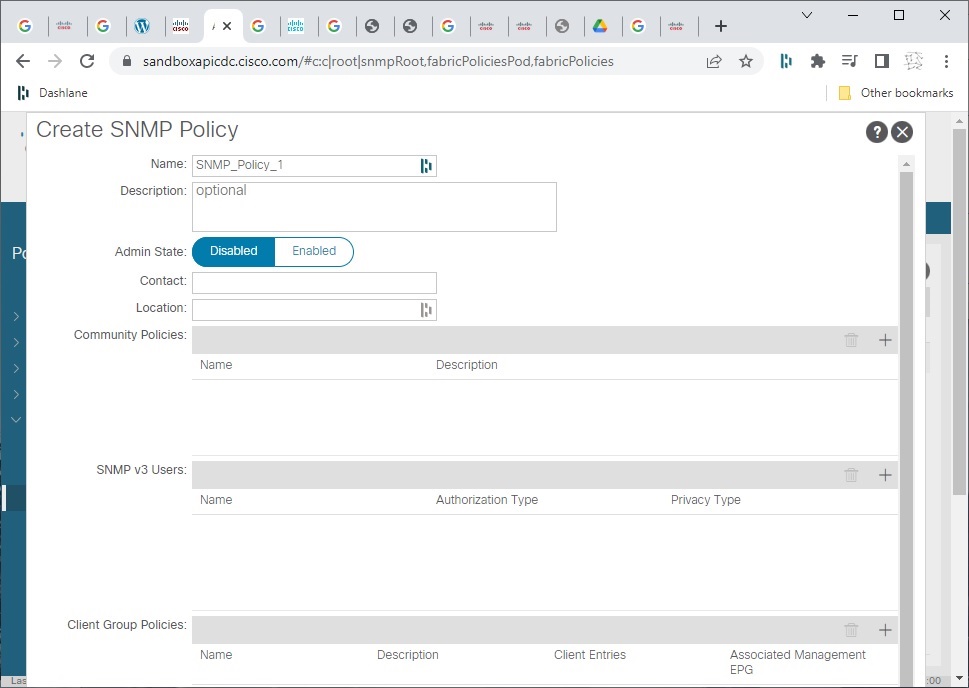
 Right-click SNMP and select Create SNMP Policy. Give it a name and click the Submit button:
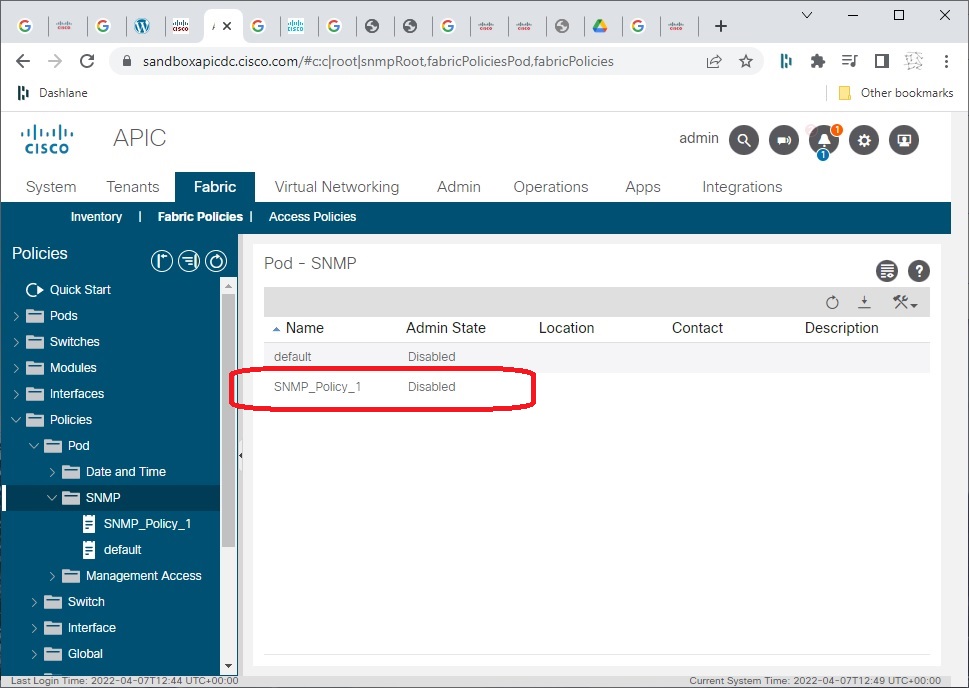
 Notice that the new SNMP policy appears:
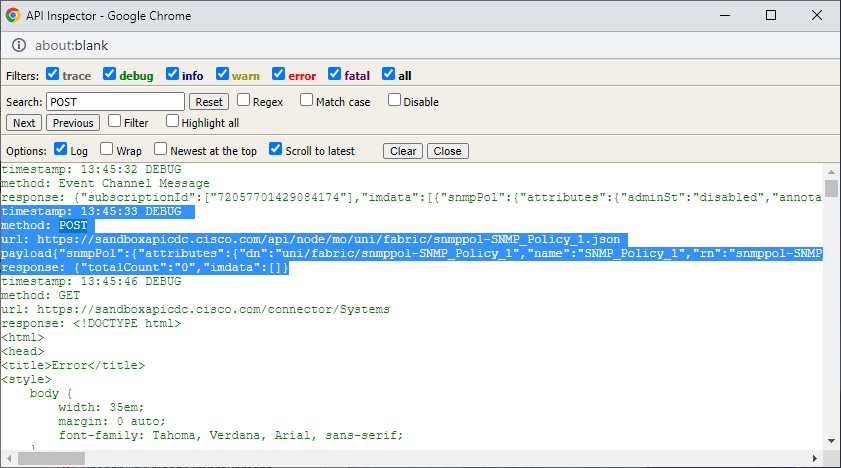
 In the APIC sandbox click the cog symbol and select Show API Inspector. In the search bar enter POST and copy the content as shown, including the URL and the payload content in particular:
 Go back to the APIC sandbox and delete the SNMP policy you created, so that it no longer appears:
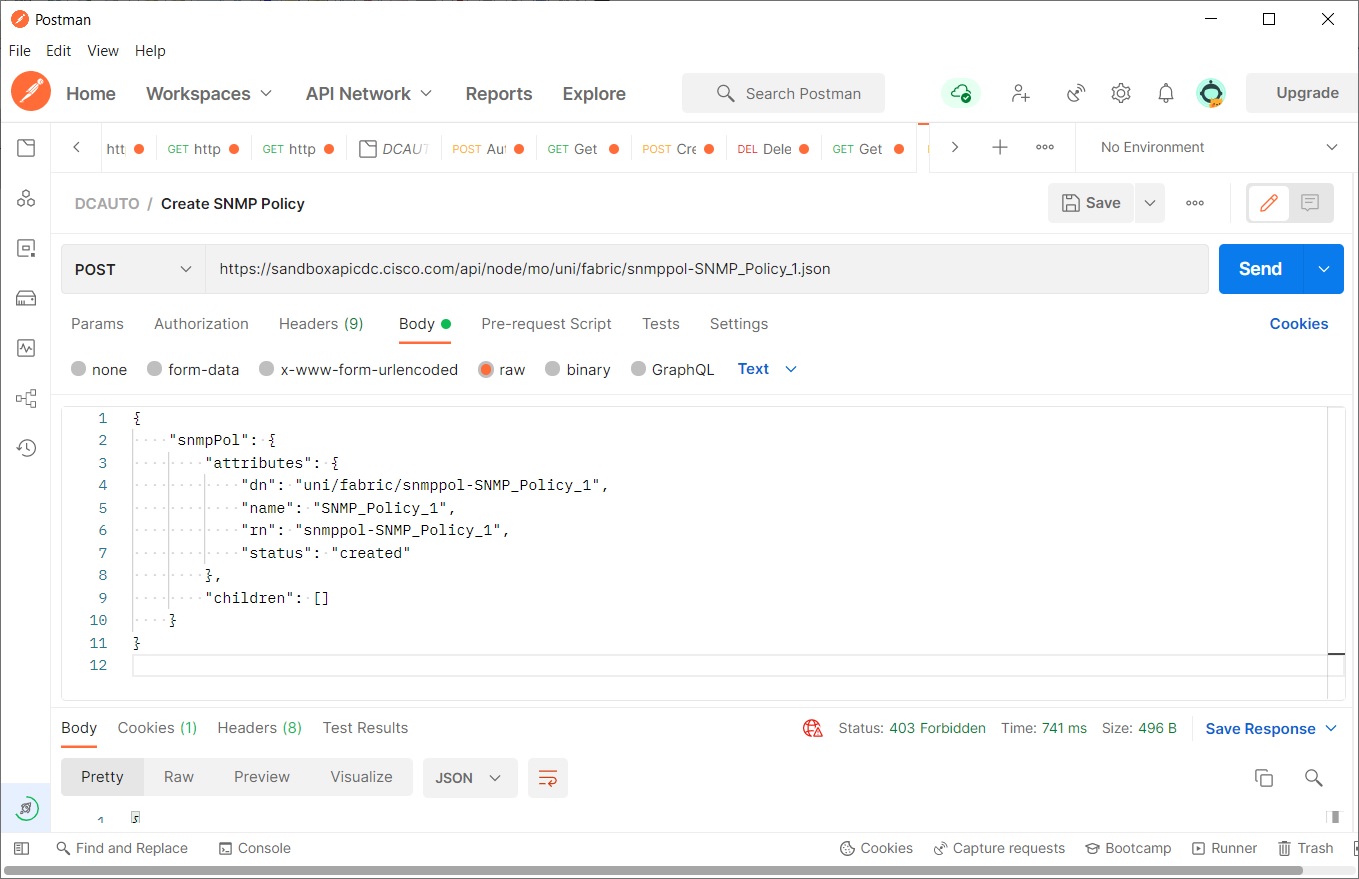
 Open Postman and create a new POST command to create the new SNMP policy using the URL and payload you just copied. (You might have to re-send the authenticate REST command if you have timed out.)
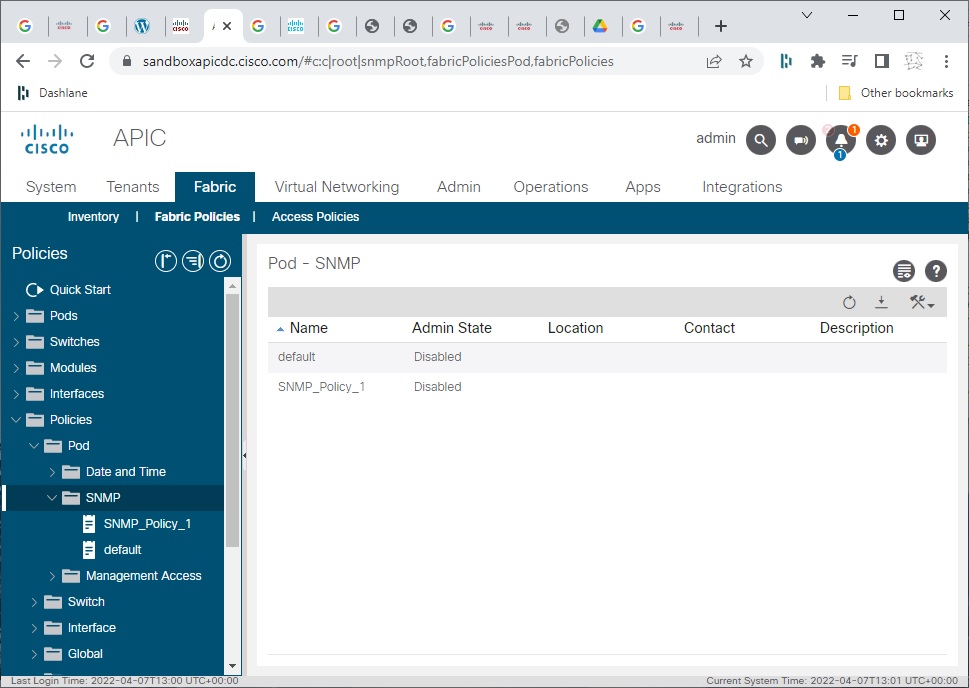
 Navigate back to the APIC sandbox and notice that the new SNMP policy appears:
This directs you to another URL which gives another link to click on to direct you to the sandbox. Grab the username / password credentials highlighted as below (click to enlarge).
On clicking this you are directed to the actual ACI sandbox. You can login using the credentials that were provided:
Thereby directing you to the sandboxed APIC ACI Inspector:
Authentication
To use the example POST login API, obtain Postman, an application used for testing APIs.
Use the POST command: https://sandboxapicdc.cisco.com/api/aaaLogin.json
Use the credentials provided in the initial setup for "name" and "pwd" to create the API body. The password may have changed since writing this blog post.
[code language="xml"]
{
"aaaUser":{
"attributes":{
"name":"admin",
"pwd":"!v3G@!4@Y"
}
}
}
[/code]
Make sure ‘Enable SSL certificate verification’ is switched off in the Settings tab and hit the Send button to get the 200 OK response:
And this is what you get in the body of the response, including the token and refresh timeout period:
[code language="xml"]
{
"totalCount": "1",
"imdata": [
{
"aaaLogin": {
"attributes": {
"token": "eyJhbGciOiJSUzI1NiIsImtpZCI6InMxMWdlb2ZiazNvNjd4bnJtaDl0NGlvMnlzYzd0ZnJyIiwidHlwIjoiand0In0.eyJyYmFjIjpbeyJkb21haW4iOiJhbGwiLCJyb2xlc1IiOjAsInJvbGVzVyI6MX1dLCJpc3MiOiJBQ0kgQVBJQyIsInVzZXJuYW1lIjoiYWRtaW4iLCJ1c2VyaWQiOjE1Mzc0LCJ1c2VyZmxhZ3MiOjAsImlhdCI6MTY0ODg4MzkwNSwiZXhwIjoxNjQ4ODg0NTA1LCJzZXNzaW9uaWQiOiJDL0pqcFUzUFFvbVlld1IzNjVCdVF3PT0ifQ.nQOAKpSUrE8a_2Uh5YMztChz2SNdGISVqsZpJspktDh2rMbI_C_EnNsluTPcwA4CzcznCgrb0plk5xcFYwmKUcwV14LbzuVbLssLjq82t5-fzu3495y_NSzB0cu2Q1-qkLhxjdD3MrdxLdxSsAEyZUgvUsJTz1Khj1w6S8lSh6_Ibt_lo0FttZRpG1uE_cMlMmR6MUm4vvxBn41z7NEXsRt3SxnCV_IT9iqw3ElwB5NfotsScNBkkNl1t1F8reH2wqrKl5vuksM4HTs058297uyib6qmfkyJPZgy46V3J3SAf7Cy_KtiOsZ8nSwYlWmCSYjIlyAptayZqxyutUDMLA",
"siteFingerprint": "s11geofbk3o67xnrmh9t4io2ysc7tfrr",
"refreshTimeoutSeconds": "600",
"maximumLifetimeSeconds": "86400",
"guiIdleTimeoutSeconds": "1200",
"restTimeoutSeconds": "90",
"creationTime": "1648883905",
"firstLoginTime": "1648883905",
"userName": "admin",
"remoteUser": "false",
"unixUserId": "15374",
"sessionId": "C/JjpU3PQomYewR365BuQw==",
"lastName": "",
"firstName": "",
"changePassword": "no",
"version": "5.2(1g)",
"buildTime": "Wed Jul 28 23:09:38 UTC 2021",
"node": "topology/pod-1/node-1"
},
"children": [
{
"aaaUserDomain": {
"attributes": {
"name": "all",
"rolesR": "admin",
"rolesW": "admin"
},
"children": [
{
"aaaReadRoles": {
"attributes": {}
}
},
{
"aaaWriteRoles": {
"attributes": {},
"children": [
{
"role": {
"attributes": {
"name": "admin"
}
}
}
]
}
}
]
}
},
{
"DnDomainMapEntry": {
"attributes": {
"dn": "uni/tn-mgmt",
"readPrivileges": "admin",
"writePrivileges": "admin"
}
}
},
{
"DnDomainMapEntry": {
"attributes": {
"dn": "uni/tn-infra",
"readPrivileges": "admin",
"writePrivileges": "admin"
}
}
},
{
"DnDomainMapEntry": {
"attributes": {
"dn": "uni/tn-common",
"readPrivileges": "admin",
"writePrivileges": "admin"
}
}
}
]
}
}
]
}
[/code]
Obtaining tenant details
An example GET command to obtain the number and details of tenants in this sandbox APIC:
[code language="txt"]
GET https://sandboxapicdc.cisco.com/api/class/fvTenant.json
[/code]
Tenant details in json format as follows
[code language="xml"]
{
"totalCount": "8",
"imdata": [
{
"fvTenant": {
"attributes": {
"annotation": "",
"childAction": "",
"descr": "",
"dn": "uni/tn-infra",
"extMngdBy": "",
"lcOwn": "local",
"modTs": "2022-04-01T11:14:49.584+00:00",
"monPolDn": "uni/tn-common/monepg-default",
"name": "infra",
"nameAlias": "",
"ownerKey": "",
"ownerTag": "",
"status": "",
"uid": "0",
"userdom": "all"
}
}
},
{
"fvTenant": {
"attributes": {
"annotation": "",
"childAction": "",
"descr": "",
"dn": "uni/tn-common",
"extMngdBy": "",
"lcOwn": "local",
"modTs": "2022-04-01T11:14:44.190+00:00",
"monPolDn": "uni/tn-common/monepg-default",
"name": "common",
"nameAlias": "",
"ownerKey": "",
"ownerTag": "",
"status": "",
"uid": "0",
"userdom": "all"
}
}
},
{
"fvTenant": {
"attributes": {
"annotation": "",
"childAction": "",
"descr": "",
"dn": "uni/tn-mgmt",
"extMngdBy": "",
"lcOwn": "local",
"modTs": "2022-04-01T11:14:49.186+00:00",
"monPolDn": "uni/tn-common/monepg-default",
"name": "mgmt",
"nameAlias": "",
"ownerKey": "",
"ownerTag": "",
"status": "",
"uid": "0",
"userdom": "all"
}
}
},
{
"fvTenant": {
"attributes": {
"annotation": "",
"childAction": "",
"descr": "Try ACI tool demo at https://oneaciapp.talapupa.com",
"dn": "uni/tn-oneaciapp",
"extMngdBy": "",
"lcOwn": "local",
"modTs": "2022-04-01T11:23:50.049+00:00",
"monPolDn": "uni/tn-common/monepg-default",
"name": "oneaciapp",
"nameAlias": "",
"ownerKey": "",
"ownerTag": "",
"status": "",
"uid": "15374",
"userdom": ":all:"
}
}
},
{
"fvTenant": {
"attributes": {
"annotation": "",
"childAction": "",
"descr": "",
"dn": "uni/tn-Heroes",
"extMngdBy": "",
"lcOwn": "local",
"modTs": "2022-04-01T11:27:26.480+00:00",
"monPolDn": "uni/tn-common/monepg-default",
"name": "Heroes",
"nameAlias": "",
"ownerKey": "",
"ownerTag": "",
"status": "",
"uid": "15374",
"userdom": ":all:"
}
}
},
{
"fvTenant": {
"attributes": {
"annotation": "",
"childAction": "",
"descr": "",
"dn": "uni/tn-SnV",
"extMngdBy": "",
"lcOwn": "local",
"modTs": "2022-04-01T11:27:26.751+00:00",
"monPolDn": "uni/tn-common/monepg-default",
"name": "SnV",
"nameAlias": "",
"ownerKey": "",
"ownerTag": "",
"status": "",
"uid": "15374",
"userdom": ":all:"
}
}
},
{
"fvTenant": {
"attributes": {
"annotation": "",
"childAction": "",
"descr": "",
"dn": "uni/tn-Aravid",
"extMngdBy": "",
"lcOwn": "local",
"modTs": "2022-04-01T12:16:43.874+00:00",
"monPolDn": "uni/tn-common/monepg-default",
"name": "Aravid",
"nameAlias": "",
"ownerKey": "",
"ownerTag": "",
"status": "",
"uid": "15374",
"userdom": ":all:"
}
}
},
{
"fvTenant": {
"attributes": {
"annotation": "",
"childAction": "",
"descr": "",
"dn": "uni/tn-tenant_public",
"extMngdBy": "",
"lcOwn": "local",
"modTs": "2022-04-01T12:25:26.738+00:00",
"monPolDn": "uni/tn-common/monepg-default",
"name": "tenant_public",
"nameAlias": "",
"ownerKey": "",
"ownerTag": "",
"status": "",
"uid": "15374",
"userdom": ":all:"
}
}
}
]
}
[/code]
One of the tenants is “common”. Search for this in the All Tenants tab to get information on end point groups (EPGs), bridge domains etc:
Creating a new tenant
Create a new tenant by using a POST command and json body containing the name, description etc. This should return a status code of 200.
POST https://sandboxapicdc.cisco.com/api/mo/uni/tn-Support.json
Body (raw)
[code language="xml"]
{
"fvTenant" : {
"attributes" : {
"name":"Support",
"descr":"The Support Organization Tenant",
"nameAlias":"Andy",
"status":"created,modified"
}
}
}
[/code]
Output:
[code language="xml"]
{
"totalCount": "0",
"imdata": []
}
[/code]
Then do the GET command to obtain the tenant information again:
GET https://sandboxapicdc.cisco.com/api/mo/uni/tn-Support.json
And we get back the tenant we just created:
[code language="xml"]
{
"totalCount": "1",
"imdata": [
{
"fvTenant": {
"attributes": {
"annotation": "",
"childAction": "",
"descr": "The Support Organization Tenant",
"dn": "uni/tn-Support",
"extMngdBy": "",
"lcOwn": "local",
"modTs": "2022-04-07T12:23:41.077+00:00",
"monPolDn": "uni/tn-common/monepg-default",
"name": "Support",
"nameAlias": "Andy",
"ownerKey": "",
"ownerTag": "",
"status": "",
"uid": "15374",
"userdom": ":all:"
}
}
}
]
}
[/code]
View the list of all tenants in the APIC on the tenant in the APIC sandbox and see that the new tenant has been added:
Deleting a tenant
Use the DELETE command to remove the tenant you created
DELETE https://sandboxapicdc.cisco.com/api/mo/uni/tn-Support.json
And see that the Support tenant is no longer visible in the APIC sandbox:
Create a fabric policy
In the previous examples the REST command and body text were provided. In this example we use the APIC API Inspector to create API requests to perform the operations.
In APIC sandbox, navigate to Fabric > Fabric Policies tab:
Right-click SNMP and select Create SNMP Policy. Give it a name and click the Submit button:
Notice that the new SNMP policy appears:
In the APIC sandbox click the cog symbol and select Show API Inspector. In the search bar enter POST and copy the content as shown, including the URL and the payload content in particular:
Go back to the APIC sandbox and delete the SNMP policy you created, so that it no longer appears:
Open Postman and create a new POST command to create the new SNMP policy using the URL and payload you just copied. (You might have to re-send the authenticate REST command if you have timed out.)
Navigate back to the APIC sandbox and notice that the new SNMP policy appears:


Comments
Post a Comment