Creating installations using Inno Setup in Visual Studio
Step 1: Run the Inno Setup installer
When using Inno Setup within Visual Studio project as a post-build exercise to create an installer package, you will need the contents of the Inno Setup folder as this will contain the command line executables, dll files etc.
If you have not already done this, you can get it from here:
http://www.jrsoftware.org/
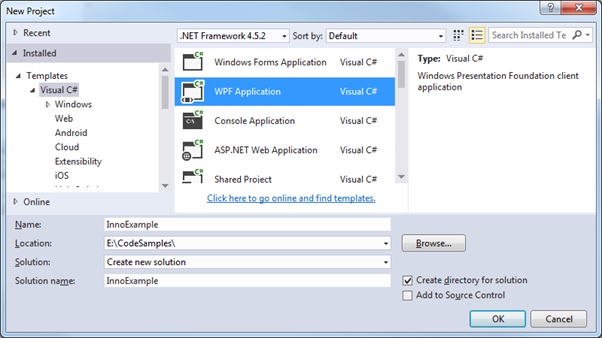
Step 2: Create a new Visual Studio project
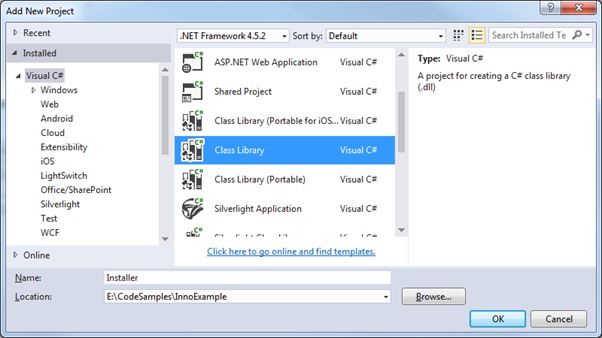
 Right click on the solution and select to add a new Installer project (class library)
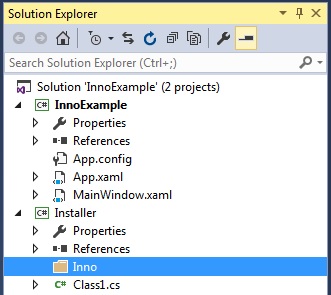
 3. Add 'Inno Setup' contents to your Installer project
I like to keep everything completely self-contained within Visual Studio projects, so whether you prefer to reference the Inno content that has already been installed to the Program Files folder is up to you
Right-click and select Add > New folder.
3. Add 'Inno Setup' contents to your Installer project
I like to keep everything completely self-contained within Visual Studio projects, so whether you prefer to reference the Inno content that has already been installed to the Program Files folder is up to you
Right-click and select Add > New folder.
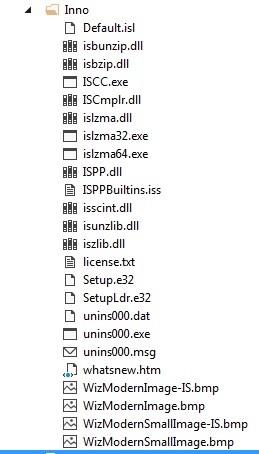
 In Windows Explorer copy the existing Inno Setup folder contents to the one you created in your Visual Studio project. Once the contents are copied over I then right-click the Inno folder and select ‘Add existing items’ to add them to the project:
 Step 4: Add the setup (*.iss) file
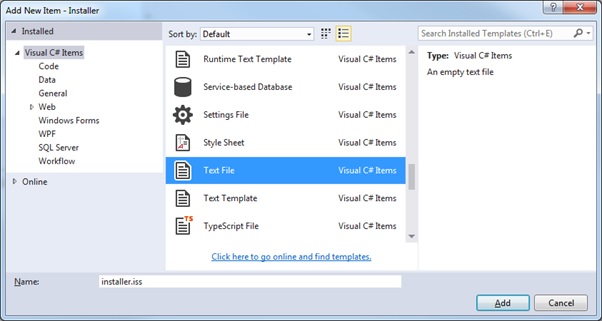
Right click the ‘Installer’ project and select ‘Add New Item’.
Select new Text File format but rename file to ‘installer.iss’
Step 4: Add the setup (*.iss) file
Right click the ‘Installer’ project and select ‘Add New Item’.
Select new Text File format but rename file to ‘installer.iss’
 Step 5: Modify the installer *.iss file
Here we use a minimalist example of the script file for demonstration purposes.
[code language="xml"]
; -- installer.iss --
[Setup]
AppName=InnoExampleInstaller
AppVersion=1.0
DefaultDirName={pf}\InnoExample
DefaultGroupName=InnoExample
Compression=lzma2
SolidCompression=yes
OutputBaseFilename=InnoExampleInstaller
OutputDir=.
UninstallDisplayIcon={app}\InnoExample.exe
UninstallDisplayName=InnoExample
[Files]
Source: "..\InnoExample\bin\Debug\InnoExample.exe"; DestDir: "{app}"
[Icons]
Name: "{group}\InnoExampleInstaller"; Filename: "{app}\InnoExample.exe"
Name: "{group}\Uninstall"; Filename: "{uninstallexe}"
[/code]
For information:
{pf} - location of the Program Files directory.
{app} – application directory
{group} – path to the start menu folder
See this link for more information on the meanings of the various constants:
http://www.jrsoftware.org/ishelp/index.php?topic=consts
Step 6: Set post-build events in the Installer project
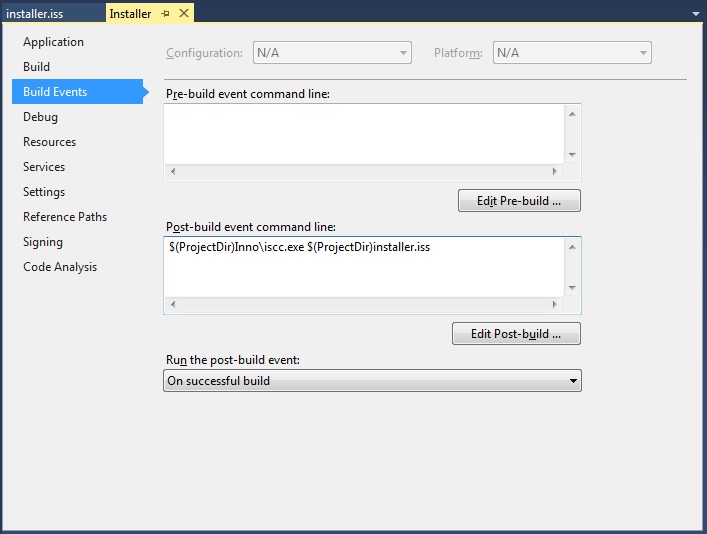
Right click the ‘Installer’ project and select properties.
Add the command to run the console application ‘iscc.exe’ on the selected iss file as a post build event:
$(ProjectDir)Inno\iscc.exe $(ProjectDir)installer.iss
Step 5: Modify the installer *.iss file
Here we use a minimalist example of the script file for demonstration purposes.
[code language="xml"]
; -- installer.iss --
[Setup]
AppName=InnoExampleInstaller
AppVersion=1.0
DefaultDirName={pf}\InnoExample
DefaultGroupName=InnoExample
Compression=lzma2
SolidCompression=yes
OutputBaseFilename=InnoExampleInstaller
OutputDir=.
UninstallDisplayIcon={app}\InnoExample.exe
UninstallDisplayName=InnoExample
[Files]
Source: "..\InnoExample\bin\Debug\InnoExample.exe"; DestDir: "{app}"
[Icons]
Name: "{group}\InnoExampleInstaller"; Filename: "{app}\InnoExample.exe"
Name: "{group}\Uninstall"; Filename: "{uninstallexe}"
[/code]
For information:
{pf} - location of the Program Files directory.
{app} – application directory
{group} – path to the start menu folder
See this link for more information on the meanings of the various constants:
http://www.jrsoftware.org/ishelp/index.php?topic=consts
Step 6: Set post-build events in the Installer project
Right click the ‘Installer’ project and select properties.
Add the command to run the console application ‘iscc.exe’ on the selected iss file as a post build event:
$(ProjectDir)Inno\iscc.exe $(ProjectDir)installer.iss
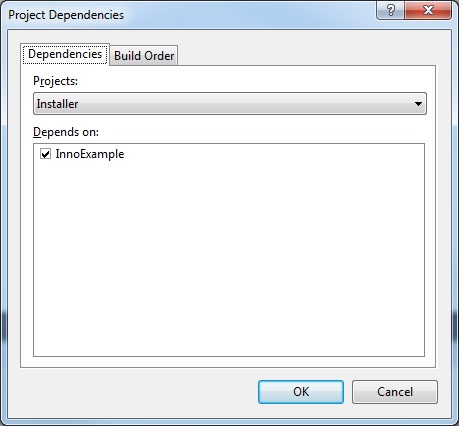
 Step 7: Set the project build dependencies
Right click on the ‘Install’ project folder and select Build dependencies. Make sure ‘InnoExample’ is a dependency of ‘Installer’:
Step 7: Set the project build dependencies
Right click on the ‘Install’ project folder and select Build dependencies. Make sure ‘InnoExample’ is a dependency of ‘Installer’:
 Step 8: Build the project
Output from build as shown, showing the stages of the setup as well the destination of the installer:
[code language="xml"]
1>------ Rebuild All started: Project: InnoExample, Configuration: Debug Any CPU ------
1> InnoExample -> E:\CodeSamples\InnoExample\InnoExample\bin\Debug\InnoExample.exe
2>------ Rebuild All started: Project: Installer, Configuration: Debug Any CPU ------
2> Installer -> E:\CodeSamples\InnoExample\Installer\bin\Debug\Installer.dll
2> Inno Setup 5 Command-Line Compiler
2> Copyright (C) 1997-2016 Jordan Russell. All rights reserved.
2> Portions Copyright (C) 2000-2016 Martijn Laan
2> Inno Setup Preprocessor
2> Copyright (C) 2001-2004 Alex Yackimoff. All rights reserved.
2>
2> Compiler engine version: Inno Setup 5.5.9 (a)
2>
2> [ISPP] Preprocessing.
2> [ISPP] Preprocessed.
2>
2> Parsing [Setup] section, line 4
2> Parsing [Setup] section, line 5
2> Parsing [Setup] section, line 6
2> Parsing [Setup] section, line 7
2> Parsing [Setup] section, line 8
2> Parsing [Setup] section, line 9
2> Parsing [Setup] section, line 10
2> Parsing [Setup] section, line 11
2> Parsing [Setup] section, line 12
2> Parsing [Setup] section, line 13
2> Reading file (WizardImageFile)
2> File: E:\CodeSamples\InnoExample\Installer\Inno\WIZMODERNIMAGE.BMP
2> Reading file (WizardSmallImageFile)
2> File: E:\CodeSamples\InnoExample\Installer\Inno\WIZMODERNSMALLIMAGE.BMP
2> Preparing Setup program executable
2> Reading default messages from Default.isl
2> Parsing [LangOptions], [Messages], and [CustomMessages] sections
2> File: E:\CodeSamples\InnoExample\Installer\Inno\Default.isl
2> Messages in script file
2> Reading [Code] section
2> Parsing [Icons] section, line 19
2> Parsing [Icons] section, line 20
2> Parsing [Files] section, line 16
2> Reading version info: E:\CodeSamples\InnoExample\Installer\..\InnoExample\bin\Debug\InnoExample.exe
2> Deleting InnoExampleInstaller.exe from output directory
2> Creating setup files
2> Compressing: E:\CodeSamples\InnoExample\Installer\..\InnoExample\bin\Debug\InnoExample.exe (1.0.0.0)
2> Compressing Setup program executable
2> Updating version info
2>
2>
2> Successful compile (0.827 sec). Resulting Setup program filename is:
2> E:\CodeSamples\InnoExample\Installer\InnoExampleInstaller.exe
========== Rebuild All: 2 succeeded, 0 failed, 0 skipped ==========
[/code]
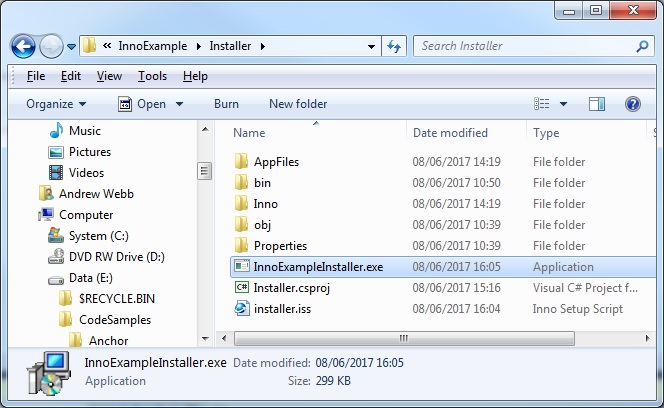
Notice that the installer package then appears in the desired location:
Step 8: Build the project
Output from build as shown, showing the stages of the setup as well the destination of the installer:
[code language="xml"]
1>------ Rebuild All started: Project: InnoExample, Configuration: Debug Any CPU ------
1> InnoExample -> E:\CodeSamples\InnoExample\InnoExample\bin\Debug\InnoExample.exe
2>------ Rebuild All started: Project: Installer, Configuration: Debug Any CPU ------
2> Installer -> E:\CodeSamples\InnoExample\Installer\bin\Debug\Installer.dll
2> Inno Setup 5 Command-Line Compiler
2> Copyright (C) 1997-2016 Jordan Russell. All rights reserved.
2> Portions Copyright (C) 2000-2016 Martijn Laan
2> Inno Setup Preprocessor
2> Copyright (C) 2001-2004 Alex Yackimoff. All rights reserved.
2>
2> Compiler engine version: Inno Setup 5.5.9 (a)
2>
2> [ISPP] Preprocessing.
2> [ISPP] Preprocessed.
2>
2> Parsing [Setup] section, line 4
2> Parsing [Setup] section, line 5
2> Parsing [Setup] section, line 6
2> Parsing [Setup] section, line 7
2> Parsing [Setup] section, line 8
2> Parsing [Setup] section, line 9
2> Parsing [Setup] section, line 10
2> Parsing [Setup] section, line 11
2> Parsing [Setup] section, line 12
2> Parsing [Setup] section, line 13
2> Reading file (WizardImageFile)
2> File: E:\CodeSamples\InnoExample\Installer\Inno\WIZMODERNIMAGE.BMP
2> Reading file (WizardSmallImageFile)
2> File: E:\CodeSamples\InnoExample\Installer\Inno\WIZMODERNSMALLIMAGE.BMP
2> Preparing Setup program executable
2> Reading default messages from Default.isl
2> Parsing [LangOptions], [Messages], and [CustomMessages] sections
2> File: E:\CodeSamples\InnoExample\Installer\Inno\Default.isl
2> Messages in script file
2> Reading [Code] section
2> Parsing [Icons] section, line 19
2> Parsing [Icons] section, line 20
2> Parsing [Files] section, line 16
2> Reading version info: E:\CodeSamples\InnoExample\Installer\..\InnoExample\bin\Debug\InnoExample.exe
2> Deleting InnoExampleInstaller.exe from output directory
2> Creating setup files
2> Compressing: E:\CodeSamples\InnoExample\Installer\..\InnoExample\bin\Debug\InnoExample.exe (1.0.0.0)
2> Compressing Setup program executable
2> Updating version info
2>
2>
2> Successful compile (0.827 sec). Resulting Setup program filename is:
2> E:\CodeSamples\InnoExample\Installer\InnoExampleInstaller.exe
========== Rebuild All: 2 succeeded, 0 failed, 0 skipped ==========
[/code]
Notice that the installer package then appears in the desired location:
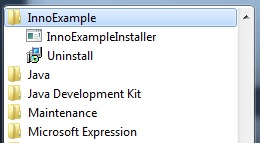
 And on running the installer the install/uninstall etc will appear in the start menu as shown:
Right click on the solution and select to add a new Installer project (class library)
3. Add 'Inno Setup' contents to your Installer project
I like to keep everything completely self-contained within Visual Studio projects, so whether you prefer to reference the Inno content that has already been installed to the Program Files folder is up to you
Right-click and select Add > New folder.
In Windows Explorer copy the existing Inno Setup folder contents to the one you created in your Visual Studio project. Once the contents are copied over I then right-click the Inno folder and select ‘Add existing items’ to add them to the project:
Step 4: Add the setup (*.iss) file
Right click the ‘Installer’ project and select ‘Add New Item’.
Select new Text File format but rename file to ‘installer.iss’
Step 5: Modify the installer *.iss file
Here we use a minimalist example of the script file for demonstration purposes.
[code language="xml"]
; -- installer.iss --
[Setup]
AppName=InnoExampleInstaller
AppVersion=1.0
DefaultDirName={pf}\InnoExample
DefaultGroupName=InnoExample
Compression=lzma2
SolidCompression=yes
OutputBaseFilename=InnoExampleInstaller
OutputDir=.
UninstallDisplayIcon={app}\InnoExample.exe
UninstallDisplayName=InnoExample
[Files]
Source: "..\InnoExample\bin\Debug\InnoExample.exe"; DestDir: "{app}"
[Icons]
Name: "{group}\InnoExampleInstaller"; Filename: "{app}\InnoExample.exe"
Name: "{group}\Uninstall"; Filename: "{uninstallexe}"
[/code]
For information:
{pf} - location of the Program Files directory.
{app} – application directory
{group} – path to the start menu folder
See this link for more information on the meanings of the various constants:
http://www.jrsoftware.org/ishelp/index.php?topic=consts
Step 6: Set post-build events in the Installer project
Right click the ‘Installer’ project and select properties.
Add the command to run the console application ‘iscc.exe’ on the selected iss file as a post build event:
$(ProjectDir)Inno\iscc.exe $(ProjectDir)installer.iss
Step 7: Set the project build dependencies
Right click on the ‘Install’ project folder and select Build dependencies. Make sure ‘InnoExample’ is a dependency of ‘Installer’:
Step 8: Build the project
Output from build as shown, showing the stages of the setup as well the destination of the installer:
[code language="xml"]
1>------ Rebuild All started: Project: InnoExample, Configuration: Debug Any CPU ------
1> InnoExample -> E:\CodeSamples\InnoExample\InnoExample\bin\Debug\InnoExample.exe
2>------ Rebuild All started: Project: Installer, Configuration: Debug Any CPU ------
2> Installer -> E:\CodeSamples\InnoExample\Installer\bin\Debug\Installer.dll
2> Inno Setup 5 Command-Line Compiler
2> Copyright (C) 1997-2016 Jordan Russell. All rights reserved.
2> Portions Copyright (C) 2000-2016 Martijn Laan
2> Inno Setup Preprocessor
2> Copyright (C) 2001-2004 Alex Yackimoff. All rights reserved.
2>
2> Compiler engine version: Inno Setup 5.5.9 (a)
2>
2> [ISPP] Preprocessing.
2> [ISPP] Preprocessed.
2>
2> Parsing [Setup] section, line 4
2> Parsing [Setup] section, line 5
2> Parsing [Setup] section, line 6
2> Parsing [Setup] section, line 7
2> Parsing [Setup] section, line 8
2> Parsing [Setup] section, line 9
2> Parsing [Setup] section, line 10
2> Parsing [Setup] section, line 11
2> Parsing [Setup] section, line 12
2> Parsing [Setup] section, line 13
2> Reading file (WizardImageFile)
2> File: E:\CodeSamples\InnoExample\Installer\Inno\WIZMODERNIMAGE.BMP
2> Reading file (WizardSmallImageFile)
2> File: E:\CodeSamples\InnoExample\Installer\Inno\WIZMODERNSMALLIMAGE.BMP
2> Preparing Setup program executable
2> Reading default messages from Default.isl
2> Parsing [LangOptions], [Messages], and [CustomMessages] sections
2> File: E:\CodeSamples\InnoExample\Installer\Inno\Default.isl
2> Messages in script file
2> Reading [Code] section
2> Parsing [Icons] section, line 19
2> Parsing [Icons] section, line 20
2> Parsing [Files] section, line 16
2> Reading version info: E:\CodeSamples\InnoExample\Installer\..\InnoExample\bin\Debug\InnoExample.exe
2> Deleting InnoExampleInstaller.exe from output directory
2> Creating setup files
2> Compressing: E:\CodeSamples\InnoExample\Installer\..\InnoExample\bin\Debug\InnoExample.exe (1.0.0.0)
2> Compressing Setup program executable
2> Updating version info
2>
2>
2> Successful compile (0.827 sec). Resulting Setup program filename is:
2> E:\CodeSamples\InnoExample\Installer\InnoExampleInstaller.exe
========== Rebuild All: 2 succeeded, 0 failed, 0 skipped ==========
[/code]
Notice that the installer package then appears in the desired location:
And on running the installer the install/uninstall etc will appear in the start menu as shown:


Comments
Post a Comment