How to use Interaction Triggers to handle user-initiated events in WPF / MVVM
Example scenario: User clicks the mouse in a WPF application - how do we 'listen' to that event in order to trigger and handle an event in the main code? A possible solution is to use 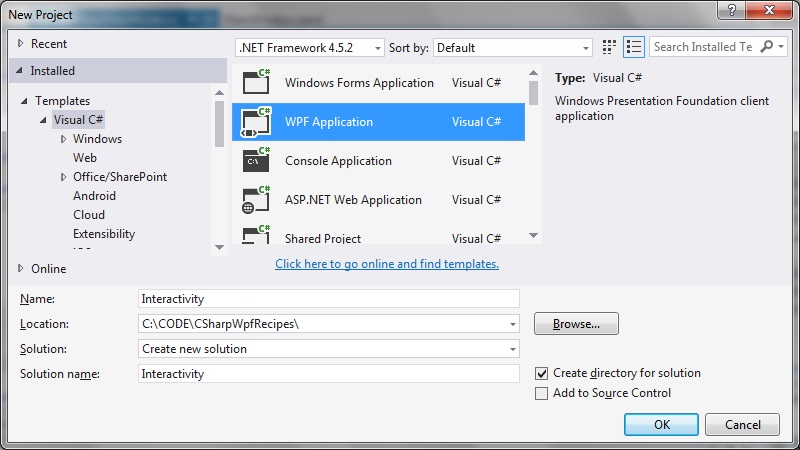 Step 2: Add the System.Windows.Interactivity reference
UPDATE
For more recent versions of .NET see this StackOverflow post on how to upgrade from older versions of Interactivity to the latest NuGet package:
https://stackoverflow.com/questions/8360209/how-to-add-system-windows-interactivity-to-project/56240223#56240223
If you need to migrate from an older version, then do these steps:
1. Remove reference to “Microsoft.Expression.Interactions” and “System.Windows.Interactivity”
2. Install the Microsoft.Xaml.Behaviors.Wpf NuGet package.
3. XAML files – replace the xmlns namespaces http://schemas.microsoft.com/expression/2010/interactivity and http://schemas.microsoft.com/expression/2010/interactions with http://schemas.microsoft.com/xaml/behaviors
4. C# files – replace the usings in c# files “Microsoft.Xaml.Interactivity” and “Microsoft.Xaml.Interactions” with “Microsoft.Xaml.Behaviors”
[Older version]
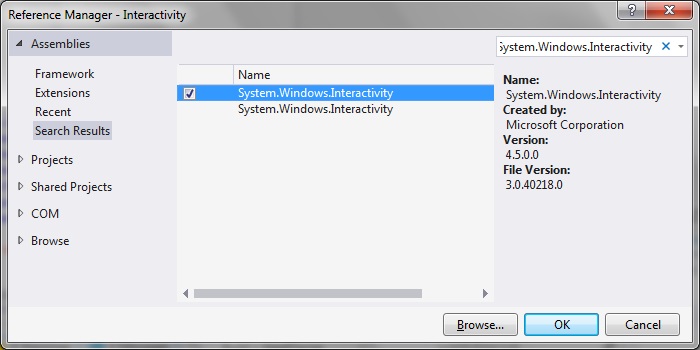
Right click the project folder and select 'Add Reference'. Select System.Windows.Interactivity reference:
Step 2: Add the System.Windows.Interactivity reference
UPDATE
For more recent versions of .NET see this StackOverflow post on how to upgrade from older versions of Interactivity to the latest NuGet package:
https://stackoverflow.com/questions/8360209/how-to-add-system-windows-interactivity-to-project/56240223#56240223
If you need to migrate from an older version, then do these steps:
1. Remove reference to “Microsoft.Expression.Interactions” and “System.Windows.Interactivity”
2. Install the Microsoft.Xaml.Behaviors.Wpf NuGet package.
3. XAML files – replace the xmlns namespaces http://schemas.microsoft.com/expression/2010/interactivity and http://schemas.microsoft.com/expression/2010/interactions with http://schemas.microsoft.com/xaml/behaviors
4. C# files – replace the usings in c# files “Microsoft.Xaml.Interactivity” and “Microsoft.Xaml.Interactions” with “Microsoft.Xaml.Behaviors”
[Older version]
Right click the project folder and select 'Add Reference'. Select System.Windows.Interactivity reference:
 And add this reference to the MainWindow.xaml:
[code language="xml"]
xmlns:i="clr-namespace:System.Windows.Interactivity;assembly=System.Windows.Interactivity"
[/code]
So that the MainWindow.xaml looks something like this:
[code language="xml"]
<Window x:Class="Interactivity.MainWindow"
xmlns="http://schemas.microsoft.com/winfx/2006/xaml/presentation"
xmlns:x="http://schemas.microsoft.com/winfx/2006/xaml"
xmlns:d="http://schemas.microsoft.com/expression/blend/2008"
xmlns:mc="http://schemas.openxmlformats.org/markup-compatibility/2006"
xmlns:i="clr-namespace:System.Windows.Interactivity;assembly=System.Windows.Interactivity"
xmlns:local="clr-namespace:Interactivity"
mc:Ignorable="d"
Title="MainWindow" Height="350" Width="525">
<Grid>
</Grid>
</Window>
[/code]
As mentioned in the update, replace usages of
[code language="xml"]
xmlns:i="http://schemas.microsoft.com/expression/2010/interactivity"
[/code]
with
[code language="xml"]
xmlns:i="http://schemas.microsoft.com/xaml/behaviors"
[/code]
Step 3: Add the event handling infrastructure
Add the following classes to you project: EventArgs.cs, EventRaiser.cs, RelayCommand.cs
EventArgs.cs
[code language="csharp"]
using System;
namespace Interactivity
{
public class EventArgs<T> : EventArgs
{
public EventArgs(T value)
{
Value = value;
}
public T Value { get; private set; }
}
}
[/code]
EventRaiser.cs
[code language="csharp"]
using System;
namespace Interactivity
{
public static class EventRaiser
{
public static void Raise(this EventHandler handler, object sender)
{
if (handler != null)
{
handler(sender, EventArgs.Empty);
}
}
public static void Raise<T>(this EventHandler<EventArgs<T>> handler, object sender, T value)
{
if (handler != null)
{
handler(sender, new EventArgs<T>(value));
}
}
public static void Raise<T>(this EventHandler<T> handler, object sender, T value) where T : EventArgs
{
if (handler != null)
{
handler(sender, value);
}
}
public static void Raise<T>(this EventHandler<EventArgs<T>> handler, object sender, EventArgs<T> value)
{
if (handler != null)
{
handler(sender, value);
}
}
}
}
[/code]
RelayCommand.cs
[code language="csharp"]
using System;
using System.Windows.Input;
namespace Interactivity
{
public class RelayCommand<T> : ICommand
{
private readonly Predicate<T> _canExecute;
private readonly Action<T> _execute;
public RelayCommand(Action<T> execute)
: this(execute, null)
{
_execute = execute;
}
public RelayCommand(Action<T> execute, Predicate<T> canExecute)
{
if (execute == null)
{
throw new ArgumentNullException("execute");
}
_execute = execute;
_canExecute = canExecute;
}
public bool CanExecute(object parameter)
{
return _canExecute == null || _canExecute((T)parameter);
}
public void Execute(object parameter)
{
_execute((T)parameter);
}
public event EventHandler CanExecuteChanged
{
add { CommandManager.RequerySuggested += value; }
remove { CommandManager.RequerySuggested -= value; }
}
}
public class RelayCommand : ICommand
{
private readonly Predicate<object> _canExecute;
private readonly Action<object> _execute;
public RelayCommand(Action<object> execute)
: this(execute, null)
{
_execute = execute;
}
public RelayCommand(Action<object> execute, Predicate<object> canExecute)
{
if (execute == null)
{
throw new ArgumentNullException("execute");
}
_execute = execute;
_canExecute = canExecute;
}
public bool CanExecute(object parameter)
{
return _canExecute == null || _canExecute(parameter);
}
public void Execute(object parameter)
{
_execute(parameter);
}
// Ensures WPF commanding infrastructure asks all RelayCommand objects whether their
// associated views should be enabled whenever a command is invoked
public event EventHandler CanExecuteChanged
{
add
{
CommandManager.RequerySuggested += value;
CanExecuteChangedInternal += value;
}
remove
{
CommandManager.RequerySuggested -= value;
CanExecuteChangedInternal -= value;
}
}
private event EventHandler CanExecuteChangedInternal;
public void RaiseCanExecuteChanged()
{
CanExecuteChangedInternal.Raise(this);
}
}
}
[/code]
Step 4: Set the MainWindow.xaml DataContext and Event Triggers
MainWindow.xaml
[code language="csharp"]
<Window x:Class="Interactivity.MainWindow"
xmlns="http://schemas.microsoft.com/winfx/2006/xaml/presentation"
xmlns:x="http://schemas.microsoft.com/winfx/2006/xaml"
xmlns:d="http://schemas.microsoft.com/expression/blend/2008"
xmlns:mc="http://schemas.openxmlformats.org/markup-compatibility/2006"
xmlns:i="clr-namespace:System.Windows.Interactivity;assembly=System.Windows.Interactivity"
xmlns:local="clr-namespace:Interactivity"
mc:Ignorable="d"
Title="MainWindow" Height="350" Width="525">
<Window.DataContext>
<local:MainWindowViewModel />
</Window.DataContext>
<i:Interaction.Triggers>
<i:EventTrigger EventName="MouseLeftButtonDown" >
<i:InvokeCommandAction Command="{Binding LeftMouseButtonDown}" />
</i:EventTrigger>
</i:Interaction.Triggers>
<Grid>
</Grid>
</Window>
[/code]
Step 5: Create a ViewModel class for the Main Window
Add the class MainWindowViewModel.cs to your project.
Our MainWindowViewModel class will be used to bind the 'left mouse button down' EventName command defined in the MainWindow.xaml.
MainWindowViewModel.cs
[code language="csharp"]
using System;
using System.Windows;
using System.Windows.Input;
namespace Interactivity
{
public class MainWindowViewModel
{
private ICommand _leftButtonDownCommand;
public ICommand LeftMouseButtonDown
{
get
{
return _leftButtonDownCommand ?? (_leftButtonDownCommand = new RelayCommand(
x =>
{
DoStuff();
}));
}
}
private static void DoStuff()
{
MessageBox.Show("Responding to left mouse button click event...");
}
}
}
[/code]
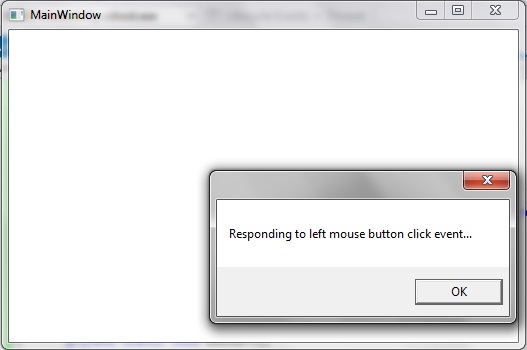
So that when we run the empty WPF application and left click anywhere on the window, the event gets handled, as evidenced by the message box that gets invoked:
And add this reference to the MainWindow.xaml:
[code language="xml"]
xmlns:i="clr-namespace:System.Windows.Interactivity;assembly=System.Windows.Interactivity"
[/code]
So that the MainWindow.xaml looks something like this:
[code language="xml"]
<Window x:Class="Interactivity.MainWindow"
xmlns="http://schemas.microsoft.com/winfx/2006/xaml/presentation"
xmlns:x="http://schemas.microsoft.com/winfx/2006/xaml"
xmlns:d="http://schemas.microsoft.com/expression/blend/2008"
xmlns:mc="http://schemas.openxmlformats.org/markup-compatibility/2006"
xmlns:i="clr-namespace:System.Windows.Interactivity;assembly=System.Windows.Interactivity"
xmlns:local="clr-namespace:Interactivity"
mc:Ignorable="d"
Title="MainWindow" Height="350" Width="525">
<Grid>
</Grid>
</Window>
[/code]
As mentioned in the update, replace usages of
[code language="xml"]
xmlns:i="http://schemas.microsoft.com/expression/2010/interactivity"
[/code]
with
[code language="xml"]
xmlns:i="http://schemas.microsoft.com/xaml/behaviors"
[/code]
Step 3: Add the event handling infrastructure
Add the following classes to you project: EventArgs.cs, EventRaiser.cs, RelayCommand.cs
EventArgs.cs
[code language="csharp"]
using System;
namespace Interactivity
{
public class EventArgs<T> : EventArgs
{
public EventArgs(T value)
{
Value = value;
}
public T Value { get; private set; }
}
}
[/code]
EventRaiser.cs
[code language="csharp"]
using System;
namespace Interactivity
{
public static class EventRaiser
{
public static void Raise(this EventHandler handler, object sender)
{
if (handler != null)
{
handler(sender, EventArgs.Empty);
}
}
public static void Raise<T>(this EventHandler<EventArgs<T>> handler, object sender, T value)
{
if (handler != null)
{
handler(sender, new EventArgs<T>(value));
}
}
public static void Raise<T>(this EventHandler<T> handler, object sender, T value) where T : EventArgs
{
if (handler != null)
{
handler(sender, value);
}
}
public static void Raise<T>(this EventHandler<EventArgs<T>> handler, object sender, EventArgs<T> value)
{
if (handler != null)
{
handler(sender, value);
}
}
}
}
[/code]
RelayCommand.cs
[code language="csharp"]
using System;
using System.Windows.Input;
namespace Interactivity
{
public class RelayCommand<T> : ICommand
{
private readonly Predicate<T> _canExecute;
private readonly Action<T> _execute;
public RelayCommand(Action<T> execute)
: this(execute, null)
{
_execute = execute;
}
public RelayCommand(Action<T> execute, Predicate<T> canExecute)
{
if (execute == null)
{
throw new ArgumentNullException("execute");
}
_execute = execute;
_canExecute = canExecute;
}
public bool CanExecute(object parameter)
{
return _canExecute == null || _canExecute((T)parameter);
}
public void Execute(object parameter)
{
_execute((T)parameter);
}
public event EventHandler CanExecuteChanged
{
add { CommandManager.RequerySuggested += value; }
remove { CommandManager.RequerySuggested -= value; }
}
}
public class RelayCommand : ICommand
{
private readonly Predicate<object> _canExecute;
private readonly Action<object> _execute;
public RelayCommand(Action<object> execute)
: this(execute, null)
{
_execute = execute;
}
public RelayCommand(Action<object> execute, Predicate<object> canExecute)
{
if (execute == null)
{
throw new ArgumentNullException("execute");
}
_execute = execute;
_canExecute = canExecute;
}
public bool CanExecute(object parameter)
{
return _canExecute == null || _canExecute(parameter);
}
public void Execute(object parameter)
{
_execute(parameter);
}
// Ensures WPF commanding infrastructure asks all RelayCommand objects whether their
// associated views should be enabled whenever a command is invoked
public event EventHandler CanExecuteChanged
{
add
{
CommandManager.RequerySuggested += value;
CanExecuteChangedInternal += value;
}
remove
{
CommandManager.RequerySuggested -= value;
CanExecuteChangedInternal -= value;
}
}
private event EventHandler CanExecuteChangedInternal;
public void RaiseCanExecuteChanged()
{
CanExecuteChangedInternal.Raise(this);
}
}
}
[/code]
Step 4: Set the MainWindow.xaml DataContext and Event Triggers
MainWindow.xaml
[code language="csharp"]
<Window x:Class="Interactivity.MainWindow"
xmlns="http://schemas.microsoft.com/winfx/2006/xaml/presentation"
xmlns:x="http://schemas.microsoft.com/winfx/2006/xaml"
xmlns:d="http://schemas.microsoft.com/expression/blend/2008"
xmlns:mc="http://schemas.openxmlformats.org/markup-compatibility/2006"
xmlns:i="clr-namespace:System.Windows.Interactivity;assembly=System.Windows.Interactivity"
xmlns:local="clr-namespace:Interactivity"
mc:Ignorable="d"
Title="MainWindow" Height="350" Width="525">
<Window.DataContext>
<local:MainWindowViewModel />
</Window.DataContext>
<i:Interaction.Triggers>
<i:EventTrigger EventName="MouseLeftButtonDown" >
<i:InvokeCommandAction Command="{Binding LeftMouseButtonDown}" />
</i:EventTrigger>
</i:Interaction.Triggers>
<Grid>
</Grid>
</Window>
[/code]
Step 5: Create a ViewModel class for the Main Window
Add the class MainWindowViewModel.cs to your project.
Our MainWindowViewModel class will be used to bind the 'left mouse button down' EventName command defined in the MainWindow.xaml.
MainWindowViewModel.cs
[code language="csharp"]
using System;
using System.Windows;
using System.Windows.Input;
namespace Interactivity
{
public class MainWindowViewModel
{
private ICommand _leftButtonDownCommand;
public ICommand LeftMouseButtonDown
{
get
{
return _leftButtonDownCommand ?? (_leftButtonDownCommand = new RelayCommand(
x =>
{
DoStuff();
}));
}
}
private static void DoStuff()
{
MessageBox.Show("Responding to left mouse button click event...");
}
}
}
[/code]
So that when we run the empty WPF application and left click anywhere on the window, the event gets handled, as evidenced by the message box that gets invoked:
Step 2: Add the System.Windows.Interactivity reference
UPDATE
For more recent versions of .NET see this StackOverflow post on how to upgrade from older versions of Interactivity to the latest NuGet package:
https://stackoverflow.com/questions/8360209/how-to-add-system-windows-interactivity-to-project/56240223#56240223
If you need to migrate from an older version, then do these steps:
1. Remove reference to “Microsoft.Expression.Interactions” and “System.Windows.Interactivity”
2. Install the Microsoft.Xaml.Behaviors.Wpf NuGet package.
3. XAML files – replace the xmlns namespaces http://schemas.microsoft.com/expression/2010/interactivity and http://schemas.microsoft.com/expression/2010/interactions with http://schemas.microsoft.com/xaml/behaviors
4. C# files – replace the usings in c# files “Microsoft.Xaml.Interactivity” and “Microsoft.Xaml.Interactions” with “Microsoft.Xaml.Behaviors”
[Older version]
Right click the project folder and select 'Add Reference'. Select System.Windows.Interactivity reference:
And add this reference to the MainWindow.xaml:
[code language="xml"]
xmlns:i="clr-namespace:System.Windows.Interactivity;assembly=System.Windows.Interactivity"
[/code]
So that the MainWindow.xaml looks something like this:
[code language="xml"]
<Window x:Class="Interactivity.MainWindow"
xmlns="http://schemas.microsoft.com/winfx/2006/xaml/presentation"
xmlns:x="http://schemas.microsoft.com/winfx/2006/xaml"
xmlns:d="http://schemas.microsoft.com/expression/blend/2008"
xmlns:mc="http://schemas.openxmlformats.org/markup-compatibility/2006"
xmlns:i="clr-namespace:System.Windows.Interactivity;assembly=System.Windows.Interactivity"
xmlns:local="clr-namespace:Interactivity"
mc:Ignorable="d"
Title="MainWindow" Height="350" Width="525">
<Grid>
</Grid>
</Window>
[/code]
As mentioned in the update, replace usages of
[code language="xml"]
xmlns:i="http://schemas.microsoft.com/expression/2010/interactivity"
[/code]
with
[code language="xml"]
xmlns:i="http://schemas.microsoft.com/xaml/behaviors"
[/code]
Step 3: Add the event handling infrastructure
Add the following classes to you project: EventArgs.cs, EventRaiser.cs, RelayCommand.cs
EventArgs.cs
[code language="csharp"]
using System;
namespace Interactivity
{
public class EventArgs<T> : EventArgs
{
public EventArgs(T value)
{
Value = value;
}
public T Value { get; private set; }
}
}
[/code]
EventRaiser.cs
[code language="csharp"]
using System;
namespace Interactivity
{
public static class EventRaiser
{
public static void Raise(this EventHandler handler, object sender)
{
if (handler != null)
{
handler(sender, EventArgs.Empty);
}
}
public static void Raise<T>(this EventHandler<EventArgs<T>> handler, object sender, T value)
{
if (handler != null)
{
handler(sender, new EventArgs<T>(value));
}
}
public static void Raise<T>(this EventHandler<T> handler, object sender, T value) where T : EventArgs
{
if (handler != null)
{
handler(sender, value);
}
}
public static void Raise<T>(this EventHandler<EventArgs<T>> handler, object sender, EventArgs<T> value)
{
if (handler != null)
{
handler(sender, value);
}
}
}
}
[/code]
RelayCommand.cs
[code language="csharp"]
using System;
using System.Windows.Input;
namespace Interactivity
{
public class RelayCommand<T> : ICommand
{
private readonly Predicate<T> _canExecute;
private readonly Action<T> _execute;
public RelayCommand(Action<T> execute)
: this(execute, null)
{
_execute = execute;
}
public RelayCommand(Action<T> execute, Predicate<T> canExecute)
{
if (execute == null)
{
throw new ArgumentNullException("execute");
}
_execute = execute;
_canExecute = canExecute;
}
public bool CanExecute(object parameter)
{
return _canExecute == null || _canExecute((T)parameter);
}
public void Execute(object parameter)
{
_execute((T)parameter);
}
public event EventHandler CanExecuteChanged
{
add { CommandManager.RequerySuggested += value; }
remove { CommandManager.RequerySuggested -= value; }
}
}
public class RelayCommand : ICommand
{
private readonly Predicate<object> _canExecute;
private readonly Action<object> _execute;
public RelayCommand(Action<object> execute)
: this(execute, null)
{
_execute = execute;
}
public RelayCommand(Action<object> execute, Predicate<object> canExecute)
{
if (execute == null)
{
throw new ArgumentNullException("execute");
}
_execute = execute;
_canExecute = canExecute;
}
public bool CanExecute(object parameter)
{
return _canExecute == null || _canExecute(parameter);
}
public void Execute(object parameter)
{
_execute(parameter);
}
// Ensures WPF commanding infrastructure asks all RelayCommand objects whether their
// associated views should be enabled whenever a command is invoked
public event EventHandler CanExecuteChanged
{
add
{
CommandManager.RequerySuggested += value;
CanExecuteChangedInternal += value;
}
remove
{
CommandManager.RequerySuggested -= value;
CanExecuteChangedInternal -= value;
}
}
private event EventHandler CanExecuteChangedInternal;
public void RaiseCanExecuteChanged()
{
CanExecuteChangedInternal.Raise(this);
}
}
}
[/code]
Step 4: Set the MainWindow.xaml DataContext and Event Triggers
MainWindow.xaml
[code language="csharp"]
<Window x:Class="Interactivity.MainWindow"
xmlns="http://schemas.microsoft.com/winfx/2006/xaml/presentation"
xmlns:x="http://schemas.microsoft.com/winfx/2006/xaml"
xmlns:d="http://schemas.microsoft.com/expression/blend/2008"
xmlns:mc="http://schemas.openxmlformats.org/markup-compatibility/2006"
xmlns:i="clr-namespace:System.Windows.Interactivity;assembly=System.Windows.Interactivity"
xmlns:local="clr-namespace:Interactivity"
mc:Ignorable="d"
Title="MainWindow" Height="350" Width="525">
<Window.DataContext>
<local:MainWindowViewModel />
</Window.DataContext>
<i:Interaction.Triggers>
<i:EventTrigger EventName="MouseLeftButtonDown" >
<i:InvokeCommandAction Command="{Binding LeftMouseButtonDown}" />
</i:EventTrigger>
</i:Interaction.Triggers>
<Grid>
</Grid>
</Window>
[/code]
Step 5: Create a ViewModel class for the Main Window
Add the class MainWindowViewModel.cs to your project.
Our MainWindowViewModel class will be used to bind the 'left mouse button down' EventName command defined in the MainWindow.xaml.
MainWindowViewModel.cs
[code language="csharp"]
using System;
using System.Windows;
using System.Windows.Input;
namespace Interactivity
{
public class MainWindowViewModel
{
private ICommand _leftButtonDownCommand;
public ICommand LeftMouseButtonDown
{
get
{
return _leftButtonDownCommand ?? (_leftButtonDownCommand = new RelayCommand(
x =>
{
DoStuff();
}));
}
}
private static void DoStuff()
{
MessageBox.Show("Responding to left mouse button click event...");
}
}
}
[/code]
So that when we run the empty WPF application and left click anywhere on the window, the event gets handled, as evidenced by the message box that gets invoked:


Comments
Post a Comment