Inserting button controls into a WPF ListView and handling their click events
Some instructions on how to :
1. Create a WPF ListView control containing a button in each row
2. Handle the event when the button in the ListView is clicked
Step 1: Create the Visual Studio WPF project
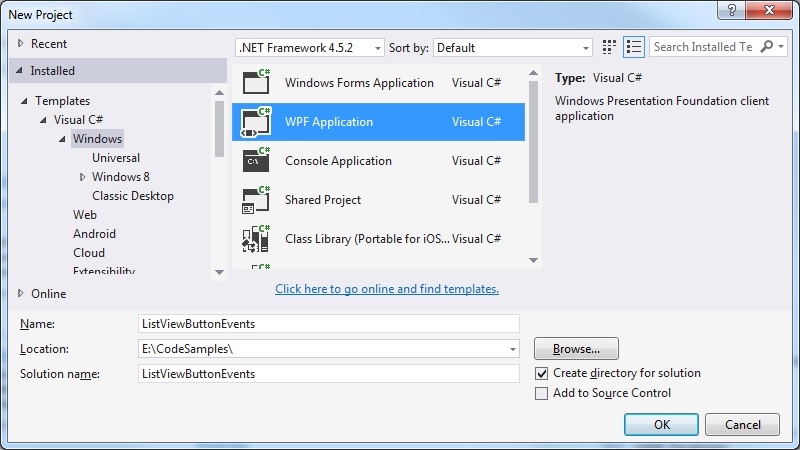 Step 2: Add event-handling and event-raising infrastructure
Just add the following classes to your project:
EventArgs.cs
[code language="csharp"]
using System;
namespace ListViewButtonEvents
{
public class EventArgs<T> : EventArgs
{
public EventArgs(T value)
{
Value = value;
}
public T Value { get; private set; }
}
}
[/code]
EventRaiser.cs
[code language="csharp"]
using System;
namespace ListViewButtonEvents
{
public static class EventRaiser
{
public static void Raise(this EventHandler handler, object sender)
{
handler?.Invoke(sender, EventArgs.Empty);
}
public static void Raise<T>(this EventHandler<EventArgs<T>> handler, object sender, T value)
{
handler?.Invoke(sender, new EventArgs<T>(value));
}
public static void Raise<T>(this EventHandler<T> handler, object sender, T value) where T : EventArgs
{
handler?.Invoke(sender, value);
}
public static void Raise<T>(this EventHandler<EventArgs<T>> handler, object sender, EventArgs<T> value)
{
handler?.Invoke(sender, value);
}
}
}
[/code]
RelayCommand.cs
[code language="csharp"]
using System;
using System.Windows.Input;
namespace ListViewButtonEvents
{
public class RelayCommand<T> : ICommand
{
private readonly Predicate<T> _canExecute;
private readonly Action<T> _execute;
public RelayCommand(Action<T> execute)
: this(execute, null)
{
_execute = execute;
}
public RelayCommand(Action<T> execute, Predicate<T> canExecute)
{
if (execute == null)
throw new ArgumentNullException(nameof(execute));
_execute = execute;
_canExecute = canExecute;
}
#region ICommand Members
public bool CanExecute(object parameter)
{
return (_canExecute == null) || _canExecute((T)parameter);
}
public void Execute(object parameter)
{
_execute((T)parameter);
}
public event EventHandler CanExecuteChanged
{
add { CommandManager.RequerySuggested += value; }
remove { CommandManager.RequerySuggested -= value; }
}
#endregion
}
public class RelayCommand : ICommand
{
private readonly Predicate<object> _canExecute;
private readonly Action<object> _execute;
public RelayCommand(Action<object> execute)
: this(execute, null)
{
_execute = execute;
}
public RelayCommand(Action<object> execute, Predicate<object> canExecute)
{
if (execute == null)
throw new ArgumentNullException("execute");
_execute = execute;
_canExecute = canExecute;
}
#region ICommand Members
public bool CanExecute(object parameter)
{
return (_canExecute == null) || _canExecute(parameter);
}
public void Execute(object parameter)
{
_execute(parameter);
}
// Ensures WPF commanding infrastructure asks all RelayCommand objects whether their
// associated views should be enabled whenever a command is invoked
public event EventHandler CanExecuteChanged
{
add
{
CommandManager.RequerySuggested += value;
CanExecuteChangedInternal += value;
}
remove
{
CommandManager.RequerySuggested -= value;
CanExecuteChangedInternal -= value;
}
}
#endregion
private event EventHandler CanExecuteChangedInternal;
public void RaiseCanExecuteChanged()
{
CanExecuteChangedInternal.Raise(this);
}
}
}
[/code]
Step 3: Create the MainWindowViewModel class used to create and access the data items
MainWindowViewModel.cs
[code language="csharp"]
using System.Collections.Generic;
using System.Windows;
using System.Windows.Input;
namespace ListViewButtonEvents
{
public class Item
{
public Item(string name, string value)
{
Name = name;
Value = value;
}
public string Name { get; set; }
public string Value { get; set; }
// This can be important!
public override string ToString()
{
return Value;
}
}
public class MainWindowViewModel
{
private ICommand _command;
public MainWindowViewModel()
{
Items = new List<Item>
{
new Item("Button 1", "12"), new Item("Button 2", "133"), new Item("Button 3", "45")
};
}
public ICommand Command
{
get { return _command ?? (_command = new RelayCommand(x => { DoStuff(x.ToString()); })); }
}
public List<Item> Items { get; set; }
private static void DoStuff(string name)
{
MessageBox.Show("Responding to click event on " + name);
}
}
}
[/code]
Step 4: Update the MainWindow.xaml
[code language="xml"]
<Window x:Class="ListViewButtonEvents.MainWindow"
xmlns="http://schemas.microsoft.com/winfx/2006/xaml/presentation"
xmlns:x="http://schemas.microsoft.com/winfx/2006/xaml"
xmlns:d="http://schemas.microsoft.com/expression/blend/2008"
xmlns:mc="http://schemas.openxmlformats.org/markup-compatibility/2006"
xmlns:local="clr-namespace:ListViewButtonEvents"
mc:Ignorable="d"
Title="MainWindow" Height="250" Width="200">
<Window.DataContext>
<local:MainWindowViewModel/>
</Window.DataContext>
<Window.Resources>
<Style x:Key="ListViewStyle" TargetType="{x:Type GridViewColumnHeader}">
<Setter Property="HorizontalContentAlignment" Value="Left" />
</Style>
</Window.Resources>
<Grid>
<ListView
VerticalAlignment="Center"
HorizontalAlignment="Center"
ItemsSource="{Binding Items}"
x:Name="ListView1">
<ListView.ItemTemplate>
<DataTemplate>
<Button
Width="80"
Height="30"
Margin="5"
Command="{Binding ElementName=ListView1, Path=DataContext.Command}"
CommandParameter="{Binding Name}">
<TextBlock Text="{Binding Name}" />
</Button>
</DataTemplate>
</ListView.ItemTemplate>
</ListView>
</Grid>
</Window>
[/code]
Step 5: Run the application
As you can see this WPF / XAML application displays the 3 x button items created
Step 2: Add event-handling and event-raising infrastructure
Just add the following classes to your project:
EventArgs.cs
[code language="csharp"]
using System;
namespace ListViewButtonEvents
{
public class EventArgs<T> : EventArgs
{
public EventArgs(T value)
{
Value = value;
}
public T Value { get; private set; }
}
}
[/code]
EventRaiser.cs
[code language="csharp"]
using System;
namespace ListViewButtonEvents
{
public static class EventRaiser
{
public static void Raise(this EventHandler handler, object sender)
{
handler?.Invoke(sender, EventArgs.Empty);
}
public static void Raise<T>(this EventHandler<EventArgs<T>> handler, object sender, T value)
{
handler?.Invoke(sender, new EventArgs<T>(value));
}
public static void Raise<T>(this EventHandler<T> handler, object sender, T value) where T : EventArgs
{
handler?.Invoke(sender, value);
}
public static void Raise<T>(this EventHandler<EventArgs<T>> handler, object sender, EventArgs<T> value)
{
handler?.Invoke(sender, value);
}
}
}
[/code]
RelayCommand.cs
[code language="csharp"]
using System;
using System.Windows.Input;
namespace ListViewButtonEvents
{
public class RelayCommand<T> : ICommand
{
private readonly Predicate<T> _canExecute;
private readonly Action<T> _execute;
public RelayCommand(Action<T> execute)
: this(execute, null)
{
_execute = execute;
}
public RelayCommand(Action<T> execute, Predicate<T> canExecute)
{
if (execute == null)
throw new ArgumentNullException(nameof(execute));
_execute = execute;
_canExecute = canExecute;
}
#region ICommand Members
public bool CanExecute(object parameter)
{
return (_canExecute == null) || _canExecute((T)parameter);
}
public void Execute(object parameter)
{
_execute((T)parameter);
}
public event EventHandler CanExecuteChanged
{
add { CommandManager.RequerySuggested += value; }
remove { CommandManager.RequerySuggested -= value; }
}
#endregion
}
public class RelayCommand : ICommand
{
private readonly Predicate<object> _canExecute;
private readonly Action<object> _execute;
public RelayCommand(Action<object> execute)
: this(execute, null)
{
_execute = execute;
}
public RelayCommand(Action<object> execute, Predicate<object> canExecute)
{
if (execute == null)
throw new ArgumentNullException("execute");
_execute = execute;
_canExecute = canExecute;
}
#region ICommand Members
public bool CanExecute(object parameter)
{
return (_canExecute == null) || _canExecute(parameter);
}
public void Execute(object parameter)
{
_execute(parameter);
}
// Ensures WPF commanding infrastructure asks all RelayCommand objects whether their
// associated views should be enabled whenever a command is invoked
public event EventHandler CanExecuteChanged
{
add
{
CommandManager.RequerySuggested += value;
CanExecuteChangedInternal += value;
}
remove
{
CommandManager.RequerySuggested -= value;
CanExecuteChangedInternal -= value;
}
}
#endregion
private event EventHandler CanExecuteChangedInternal;
public void RaiseCanExecuteChanged()
{
CanExecuteChangedInternal.Raise(this);
}
}
}
[/code]
Step 3: Create the MainWindowViewModel class used to create and access the data items
MainWindowViewModel.cs
[code language="csharp"]
using System.Collections.Generic;
using System.Windows;
using System.Windows.Input;
namespace ListViewButtonEvents
{
public class Item
{
public Item(string name, string value)
{
Name = name;
Value = value;
}
public string Name { get; set; }
public string Value { get; set; }
// This can be important!
public override string ToString()
{
return Value;
}
}
public class MainWindowViewModel
{
private ICommand _command;
public MainWindowViewModel()
{
Items = new List<Item>
{
new Item("Button 1", "12"), new Item("Button 2", "133"), new Item("Button 3", "45")
};
}
public ICommand Command
{
get { return _command ?? (_command = new RelayCommand(x => { DoStuff(x.ToString()); })); }
}
public List<Item> Items { get; set; }
private static void DoStuff(string name)
{
MessageBox.Show("Responding to click event on " + name);
}
}
}
[/code]
Step 4: Update the MainWindow.xaml
[code language="xml"]
<Window x:Class="ListViewButtonEvents.MainWindow"
xmlns="http://schemas.microsoft.com/winfx/2006/xaml/presentation"
xmlns:x="http://schemas.microsoft.com/winfx/2006/xaml"
xmlns:d="http://schemas.microsoft.com/expression/blend/2008"
xmlns:mc="http://schemas.openxmlformats.org/markup-compatibility/2006"
xmlns:local="clr-namespace:ListViewButtonEvents"
mc:Ignorable="d"
Title="MainWindow" Height="250" Width="200">
<Window.DataContext>
<local:MainWindowViewModel/>
</Window.DataContext>
<Window.Resources>
<Style x:Key="ListViewStyle" TargetType="{x:Type GridViewColumnHeader}">
<Setter Property="HorizontalContentAlignment" Value="Left" />
</Style>
</Window.Resources>
<Grid>
<ListView
VerticalAlignment="Center"
HorizontalAlignment="Center"
ItemsSource="{Binding Items}"
x:Name="ListView1">
<ListView.ItemTemplate>
<DataTemplate>
<Button
Width="80"
Height="30"
Margin="5"
Command="{Binding ElementName=ListView1, Path=DataContext.Command}"
CommandParameter="{Binding Name}">
<TextBlock Text="{Binding Name}" />
</Button>
</DataTemplate>
</ListView.ItemTemplate>
</ListView>
</Grid>
</Window>
[/code]
Step 5: Run the application
As you can see this WPF / XAML application displays the 3 x button items created
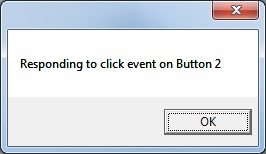
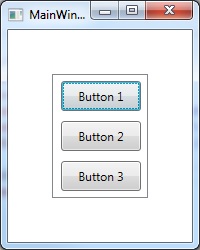 Clicking on 'Button 2' for example handles the event as desired:
Step 2: Add event-handling and event-raising infrastructure
Just add the following classes to your project:
EventArgs.cs
[code language="csharp"]
using System;
namespace ListViewButtonEvents
{
public class EventArgs<T> : EventArgs
{
public EventArgs(T value)
{
Value = value;
}
public T Value { get; private set; }
}
}
[/code]
EventRaiser.cs
[code language="csharp"]
using System;
namespace ListViewButtonEvents
{
public static class EventRaiser
{
public static void Raise(this EventHandler handler, object sender)
{
handler?.Invoke(sender, EventArgs.Empty);
}
public static void Raise<T>(this EventHandler<EventArgs<T>> handler, object sender, T value)
{
handler?.Invoke(sender, new EventArgs<T>(value));
}
public static void Raise<T>(this EventHandler<T> handler, object sender, T value) where T : EventArgs
{
handler?.Invoke(sender, value);
}
public static void Raise<T>(this EventHandler<EventArgs<T>> handler, object sender, EventArgs<T> value)
{
handler?.Invoke(sender, value);
}
}
}
[/code]
RelayCommand.cs
[code language="csharp"]
using System;
using System.Windows.Input;
namespace ListViewButtonEvents
{
public class RelayCommand<T> : ICommand
{
private readonly Predicate<T> _canExecute;
private readonly Action<T> _execute;
public RelayCommand(Action<T> execute)
: this(execute, null)
{
_execute = execute;
}
public RelayCommand(Action<T> execute, Predicate<T> canExecute)
{
if (execute == null)
throw new ArgumentNullException(nameof(execute));
_execute = execute;
_canExecute = canExecute;
}
#region ICommand Members
public bool CanExecute(object parameter)
{
return (_canExecute == null) || _canExecute((T)parameter);
}
public void Execute(object parameter)
{
_execute((T)parameter);
}
public event EventHandler CanExecuteChanged
{
add { CommandManager.RequerySuggested += value; }
remove { CommandManager.RequerySuggested -= value; }
}
#endregion
}
public class RelayCommand : ICommand
{
private readonly Predicate<object> _canExecute;
private readonly Action<object> _execute;
public RelayCommand(Action<object> execute)
: this(execute, null)
{
_execute = execute;
}
public RelayCommand(Action<object> execute, Predicate<object> canExecute)
{
if (execute == null)
throw new ArgumentNullException("execute");
_execute = execute;
_canExecute = canExecute;
}
#region ICommand Members
public bool CanExecute(object parameter)
{
return (_canExecute == null) || _canExecute(parameter);
}
public void Execute(object parameter)
{
_execute(parameter);
}
// Ensures WPF commanding infrastructure asks all RelayCommand objects whether their
// associated views should be enabled whenever a command is invoked
public event EventHandler CanExecuteChanged
{
add
{
CommandManager.RequerySuggested += value;
CanExecuteChangedInternal += value;
}
remove
{
CommandManager.RequerySuggested -= value;
CanExecuteChangedInternal -= value;
}
}
#endregion
private event EventHandler CanExecuteChangedInternal;
public void RaiseCanExecuteChanged()
{
CanExecuteChangedInternal.Raise(this);
}
}
}
[/code]
Step 3: Create the MainWindowViewModel class used to create and access the data items
MainWindowViewModel.cs
[code language="csharp"]
using System.Collections.Generic;
using System.Windows;
using System.Windows.Input;
namespace ListViewButtonEvents
{
public class Item
{
public Item(string name, string value)
{
Name = name;
Value = value;
}
public string Name { get; set; }
public string Value { get; set; }
// This can be important!
public override string ToString()
{
return Value;
}
}
public class MainWindowViewModel
{
private ICommand _command;
public MainWindowViewModel()
{
Items = new List<Item>
{
new Item("Button 1", "12"), new Item("Button 2", "133"), new Item("Button 3", "45")
};
}
public ICommand Command
{
get { return _command ?? (_command = new RelayCommand(x => { DoStuff(x.ToString()); })); }
}
public List<Item> Items { get; set; }
private static void DoStuff(string name)
{
MessageBox.Show("Responding to click event on " + name);
}
}
}
[/code]
Step 4: Update the MainWindow.xaml
[code language="xml"]
<Window x:Class="ListViewButtonEvents.MainWindow"
xmlns="http://schemas.microsoft.com/winfx/2006/xaml/presentation"
xmlns:x="http://schemas.microsoft.com/winfx/2006/xaml"
xmlns:d="http://schemas.microsoft.com/expression/blend/2008"
xmlns:mc="http://schemas.openxmlformats.org/markup-compatibility/2006"
xmlns:local="clr-namespace:ListViewButtonEvents"
mc:Ignorable="d"
Title="MainWindow" Height="250" Width="200">
<Window.DataContext>
<local:MainWindowViewModel/>
</Window.DataContext>
<Window.Resources>
<Style x:Key="ListViewStyle" TargetType="{x:Type GridViewColumnHeader}">
<Setter Property="HorizontalContentAlignment" Value="Left" />
</Style>
</Window.Resources>
<Grid>
<ListView
VerticalAlignment="Center"
HorizontalAlignment="Center"
ItemsSource="{Binding Items}"
x:Name="ListView1">
<ListView.ItemTemplate>
<DataTemplate>
<Button
Width="80"
Height="30"
Margin="5"
Command="{Binding ElementName=ListView1, Path=DataContext.Command}"
CommandParameter="{Binding Name}">
<TextBlock Text="{Binding Name}" />
</Button>
</DataTemplate>
</ListView.ItemTemplate>
</ListView>
</Grid>
</Window>
[/code]
Step 5: Run the application
As you can see this WPF / XAML application displays the 3 x button items created
Clicking on 'Button 2' for example handles the event as desired:


Comments
Post a Comment