Getting started with SWiG for interfacing between C# and C++ Visual Studio projects
1. Download and extract the SWiG interface:
Windows version available here:
http://prdownloads.sourceforge.net/swig/swigwin-2.0.9.zip
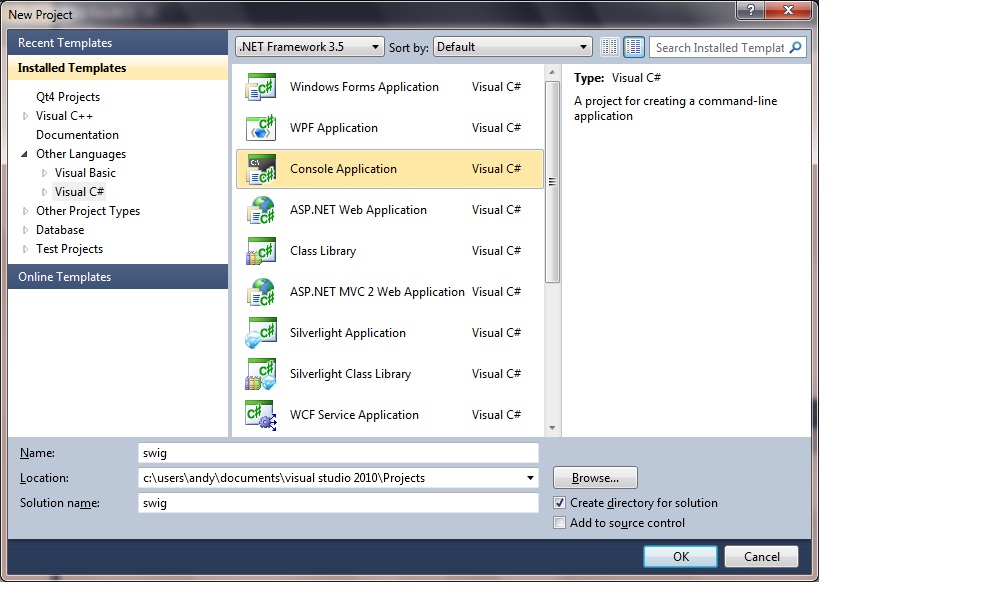
2. Create your C# console application
 3. Create your C++ console application:
Create a new C++ console application inside the existing solution you have open, and call it 'cpp'. To do this right-click your solution icon and select Add > New Project...:
3. Create your C++ console application:
Create a new C++ console application inside the existing solution you have open, and call it 'cpp'. To do this right-click your solution icon and select Add > New Project...:
 In the Application Settings select the DLL radio button, check Empty project and click Finish:
 4. Create a folder in the C# project for your SWiG-generated C# files:
In this example, we'll call it
4. Create a folder in the C# project for your SWiG-generated C# files:
In this example, we'll call it  5. Create the C++ code and interface files in your C++ console project
In your C++ project add the .cpp, .h and .i files.
In this example, the cpp_file.{cpp, h, i} files.
cpp_file.h
[code language="cpp"]
#pragma once
#ifdef CPP_EXPORTS
#define CPP_API __declspec(dllexport)
#else
#define CPP_API __declspec(dllimport)
#endif
class CPP_API cpp_file
{
public:
cpp_file(void);
~cpp_file(void);
int times2(int arg);
};
[/code]
cpp_file.cpp
[code language="cpp"]
#include "cpp_file.h"
cpp_file::cpp_file(void)
{
}
cpp_file::~cpp_file(void)
{
}
int cpp_file::times2(int arg)
{
return arg * 2;
}
[/code]
cpp_file.i
[code language="text"]
%module cpp
%{
#include "cpp_file.h"
%}
%include <windows.i>
%include "cpp_file.h"
[/code]
6. Set interface file build properties
i. Click on the the
5. Create the C++ code and interface files in your C++ console project
In your C++ project add the .cpp, .h and .i files.
In this example, the cpp_file.{cpp, h, i} files.
cpp_file.h
[code language="cpp"]
#pragma once
#ifdef CPP_EXPORTS
#define CPP_API __declspec(dllexport)
#else
#define CPP_API __declspec(dllimport)
#endif
class CPP_API cpp_file
{
public:
cpp_file(void);
~cpp_file(void);
int times2(int arg);
};
[/code]
cpp_file.cpp
[code language="cpp"]
#include "cpp_file.h"
cpp_file::cpp_file(void)
{
}
cpp_file::~cpp_file(void)
{
}
int cpp_file::times2(int arg)
{
return arg * 2;
}
[/code]
cpp_file.i
[code language="text"]
%module cpp
%{
#include "cpp_file.h"
%}
%include <windows.i>
%include "cpp_file.h"
[/code]
6. Set interface file build properties
i. Click on the the 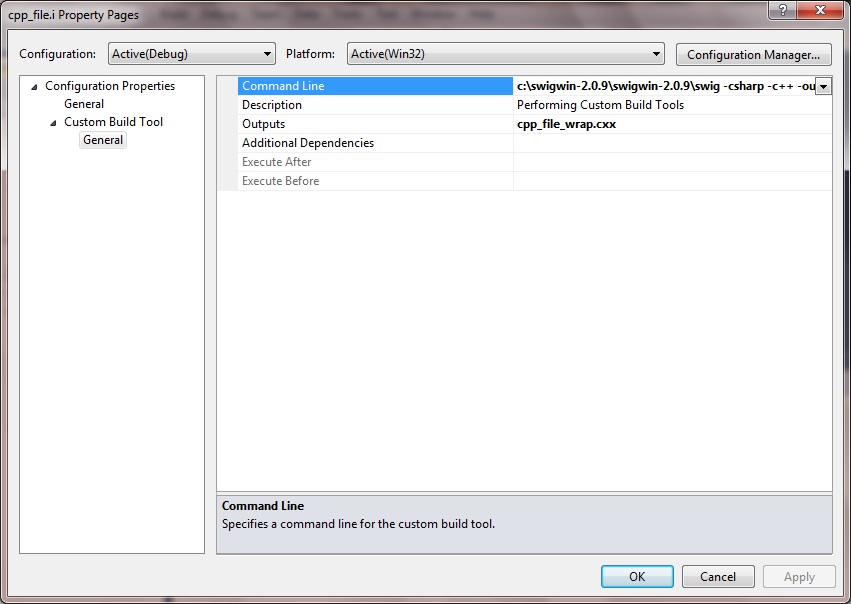 Please note: I had previously experienced problems in performing step 7 described below, with what I think were output directory names that SWiG did not seem to like. For example, using the swig command with an output directory with whitespaces in, such as in this example:
 Add the cpp_file_wrap.cxx to it: right-click the 'Generated Files' filter folder and select Add > Existing Item, and select the cpp_file_wrap.cxx file.
8. Add the SWiG-generated C# files to the C# project.
Right-click the 'Generated' folder, select Add > Existing Items, navigate to the 'Generated' folder and select the three generated C# files:
Add the cpp_file_wrap.cxx to it: right-click the 'Generated Files' filter folder and select Add > Existing Item, and select the cpp_file_wrap.cxx file.
8. Add the SWiG-generated C# files to the C# project.
Right-click the 'Generated' folder, select Add > Existing Items, navigate to the 'Generated' folder and select the three generated C# files:
 9. Set the project dependencies
Right-click the solution folder, and select Project Dependencies...
9. Set the project dependencies
Right-click the solution folder, and select Project Dependencies...
 In the C# project's Properties > Build tab, change the Output Path from bin\Debug to ..\Debug or whatever the relative path to the C++ Project output directory is.
The .exe and .dll need to be in the same directory.
In the C# project's Properties > Build tab, change the Output Path from bin\Debug to ..\Debug or whatever the relative path to the C++ Project output directory is.
The .exe and .dll need to be in the same directory.
 10. Start using the C++ APIs in your C# code
A very simple example.
[code language="csharp"]
using System;
using System.Collections.Generic;
using System.Linq;
using System.Text;
namespace swig3
{
class Program
{
static void Main(string[] args)
{
var cpp = new cpp_file();
Console.WriteLine("Five times two = " + cpp.times2(5));
}
}
}
[/code]
Do a clean and rebuild of the entire solution. Click 'Yes' if prompted to reload any files:
10. Start using the C++ APIs in your C# code
A very simple example.
[code language="csharp"]
using System;
using System.Collections.Generic;
using System.Linq;
using System.Text;
namespace swig3
{
class Program
{
static void Main(string[] args)
{
var cpp = new cpp_file();
Console.WriteLine("Five times two = " + cpp.times2(5));
}
}
}
[/code]
Do a clean and rebuild of the entire solution. Click 'Yes' if prompted to reload any files:
 If you get a compiler error similar to this one:
 Download available
Why not download a fully self-contained Visual Studio 2010 project to interface your C# console application with APIs written in C++, as described in this post? Available for 99 cents, to help cover costs of running this site.
This Visual Studio project contains the necessary SWiG executable and libraries (version 3.0.8) and uses relative paths to access them so that no further configuration is necessary - just build and execute in Release or Debug modes.
Download available
Why not download a fully self-contained Visual Studio 2010 project to interface your C# console application with APIs written in C++, as described in this post? Available for 99 cents, to help cover costs of running this site.
This Visual Studio project contains the necessary SWiG executable and libraries (version 3.0.8) and uses relative paths to access them so that no further configuration is necessary - just build and execute in Release or Debug modes.
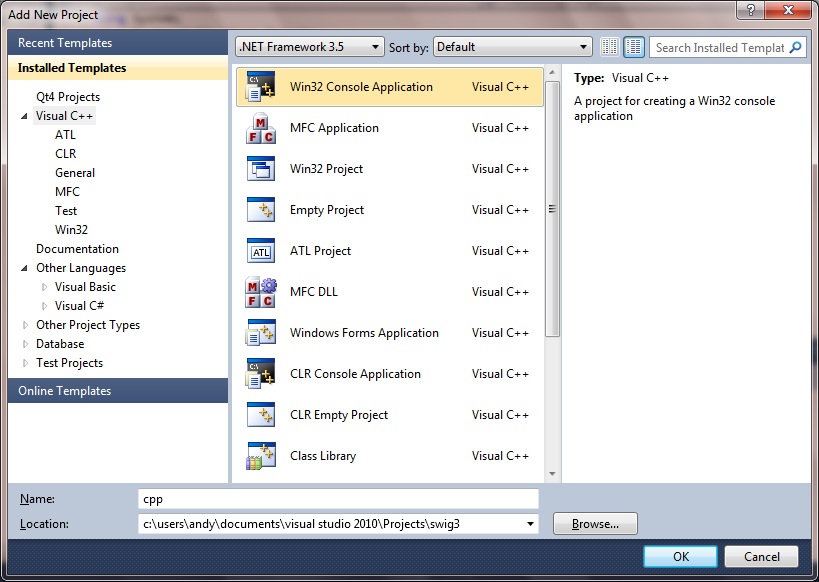
3. Create your C++ console application:
Create a new C++ console application inside the existing solution you have open, and call it 'cpp'. To do this right-click your solution icon and select Add > New Project...:
In the Application Settings select the DLL radio button, check Empty project and click Finish:
4. Create a folder in the C# project for your SWiG-generated C# files:
In this example, we'll call it Generated. Right-click the C# project, select Add > New Folder, and rename to Generated:
5. Create the C++ code and interface files in your C++ console project
In your C++ project add the .cpp, .h and .i files.
In this example, the cpp_file.{cpp, h, i} files.
cpp_file.h
[code language="cpp"]
#pragma once
#ifdef CPP_EXPORTS
#define CPP_API __declspec(dllexport)
#else
#define CPP_API __declspec(dllimport)
#endif
class CPP_API cpp_file
{
public:
cpp_file(void);
~cpp_file(void);
int times2(int arg);
};
[/code]
cpp_file.cpp
[code language="cpp"]
#include "cpp_file.h"
cpp_file::cpp_file(void)
{
}
cpp_file::~cpp_file(void)
{
}
int cpp_file::times2(int arg)
{
return arg * 2;
}
[/code]
cpp_file.i
[code language="text"]
%module cpp
%{
#include "cpp_file.h"
%}
%include <windows.i>
%include "cpp_file.h"
[/code]
6. Set interface file build properties
i. Click on the the cpp_file.i and select Properties > General > Item Type as Custom Build Tool. Select Apply to create the Custom Build Tool property group.
ii. In Custom Build Tool > General > Command Line enter the command needed for SWiG generation:
swig -csharp -c++ -outdir <MyGenerateFolderLocation> cpp_file.i
In my example, this particular setting is:
c:\swigwin-2.0.9\swigwin-2.0.9\swig -csharp -c++ -outdir C:\dump\swig\swig\Generated cpp_file.i
iii. In the Outputs setting enter 'cpp_file_wrap.cxx'.
Please note: I had previously experienced problems in performing step 7 described below, with what I think were output directory names that SWiG did not seem to like. For example, using the swig command with an output directory with whitespaces in, such as in this example:
c:\swigwin-2.0.9\swigwin-2.0.9\swig.exe -csharp -c++ -outdir “C:\Users\andy\Documents\visual studio 2010\Projects\swig\swig\Generated” cpp_file.i
Caused output errors similar to the following:
swig error : Unrecognized option studio
swig error : Unrecognized option 2010\Projects\swig\swig\Generated"
Use 'swig -help' for available options.
Using the simpler directory structure, with no whitespaces, fixed this particular problem. Also sometimes it did not seem to know where the swig executable was located, so specifying this explicitly, as in "c:\swigwin-2.0.9\swigwin-2.0.9\swig.exe" instead of just "swig" also cured this particular problem. Feel free to comment with your own experiences.
7. Compile the interface file
Right-click cpp_file.i and select 'Compile'.
This should create four files, which will probably not yet be visible in your Visual Studio project.
Three in the C# 'Generated folder':
[code language="text"]
cpp.cs
cpp_file.cs
cppPINVOKE.cs
[/code]
And one in the C++ project:
[code language="text"]cpp_file_wrap.cxx
[/code]
7. Create a Generated Files filter in the C++ console project and add the generated *.cxx file
Right-click your C++ project and select Add > New Filter. Call it 'Generated Files'
Add the cpp_file_wrap.cxx to it: right-click the 'Generated Files' filter folder and select Add > Existing Item, and select the cpp_file_wrap.cxx file.
8. Add the SWiG-generated C# files to the C# project.
Right-click the 'Generated' folder, select Add > Existing Items, navigate to the 'Generated' folder and select the three generated C# files:
9. Set the project dependencies
Right-click the solution folder, and select Project Dependencies...
In the C# project's Properties > Build tab, change the Output Path from bin\Debug to ..\Debug or whatever the relative path to the C++ Project output directory is.
The .exe and .dll need to be in the same directory.
10. Start using the C++ APIs in your C# code
A very simple example.
[code language="csharp"]
using System;
using System.Collections.Generic;
using System.Linq;
using System.Text;
namespace swig3
{
class Program
{
static void Main(string[] args)
{
var cpp = new cpp_file();
Console.WriteLine("Five times two = " + cpp.times2(5));
}
}
}
[/code]
Do a clean and rebuild of the entire solution. Click 'Yes' if prompted to reload any files:
If you get a compiler error similar to this one:
error CS0246: The type or namespace name 'cpp_file' could not be found (are you missing a using directive or an assembly reference?)
Make sure you have actually added the three SWiG-generated C# files to the 'Generated' folder, as described in step 8.
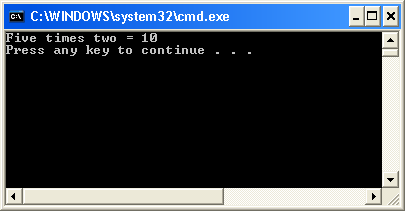
11. Try it out
To verify that the interface in place, try stepping through the code with the debugger, perhaps using F11 to step inside the code cpp.times2(5) to verify that the C++ portions of the code are getting executed as well.
Example console output testing the C++ "times2" API:
Download available
Why not download a fully self-contained Visual Studio 2010 project to interface your C# console application with APIs written in C++, as described in this post? Available for 99 cents, to help cover costs of running this site.
This Visual Studio project contains the necessary SWiG executable and libraries (version 3.0.8) and uses relative paths to access them so that no further configuration is necessary - just build and execute in Release or Debug modes.


Comments
Post a Comment